You have recently installed kext, application, update, another OS on a different partition and after boot all you get is a blinking cursor, and no darwin boot, and system not booting.
this post will explain step by step how to turn your partition back to a bootable state.
Data you should know.
you need to know what are you hard disk and partitions configuration,
- how many drives do you have
- how many partition on each drive
- what OS and File System is installed on each Partition
- what OS you would like to restore as primary boot loader
Solution 1:
first solution is accomplished using the "GNU Gparted Live CD", it is free Linux based application, you can download it here as an ISO file, you need to burn the iso file on to a CD and boot from it.
first solution is accomplished using the "GNU Gparted Live CD", it is free Linux based application, you can download it here as an ISO file, you need to burn the iso file on to a CD and boot from it.
once you boot from the Live Cd you see this screen:
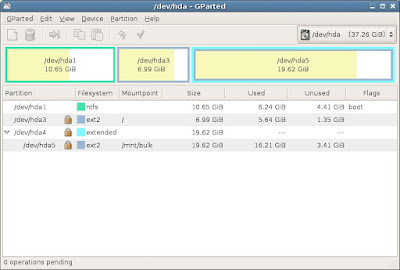
in the upper graphic parts you see square shapes that each represent a partition, above them there is a drop down that display the currently selected hard drive (in this case hda and its size is 37G), in linux (as in mac) drive is represented as file under folder dev, so the first drive is: /dev/hda.
if you choose from the drop down another driver it will display that drives partitions.
the lower table display the partitions in more details, you can see in this example that the first partition is NTFS, and it has the boot flag marked, that means that the NT file system will be booted from.
one of the thing you can do, is set a partition to being a bootable by setting the boot flag to it. you do that by right clicking with the mouse on the desired partition and choosing "manage flags" , from the pop up window check the boot flag check-box, close the window and click the "Apply Changes" button after it finish, reboot, and your HFS+ file system should be bootable again.
Solution 2:
there is another option to do this from command line using the fdisk utility available from the leopard DVD.
steps:
- insert the Leopard install DVD and boot from it
- at boot time press F8, and you will see the darwin boot screen
- write -s and press enter this will enter "Single User" mode
- execute the two lines that appear there regarding fsck and mount as described in the "Single User" post.
- next enter these commands:
fdisk -e /dev/rdiskX (where X stands for your leopard install hard disk number (first one is 0 second is 1 etc.))
then in the fdisk utility write ? for list of commands (help screen)
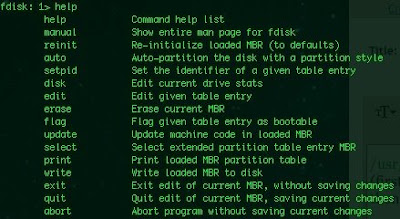
write p (short for print) and press enter then it will display a table of disks and partitions
find your HFS+ partition and remember its number (if it is the first partition it will be 1)
next write: f X where X stands for the HFS+ partition probably 1 if it is the first partition,
next write: u (short for update) and press enter
then write: w (short for write) and press enter
lastly press q (quit)
then restart and the HFS+ partition should be bootable again.
so for summary, the commands should look like this:
boot single mode (after restart press F8, at the prompt write -s and press enter)
/usr/sbin/fdisk -e /dev/rdisk0
f 1
u
w
q
Reboot
if these solutions did not help that means one of two things:
if these solutions did not help that means one of two things:
- you have just installed Leopard and did not install Darwin as described in the "Install Leopard" post.
- or for some reason your partition ID has changed from AF to something else causing the HFS+ file system to recognized incorrectly.
the second case can be solved from the fdisk utility instructions in this post.
Enjoy.
No comments:
Post a Comment