Showing posts with label menu bar. Show all posts

Monday, June 2, 2008

Power Management on 10.5.3


10.5.3 update has ruin my Power Management icon in the menu bar, i fixed it using this method:


ether use this auto installer or use the manual method described here:

1. open terminal
2. write: sudo -s
3. enter password and press enter
4. write: vi /System/Library/Extensions/AppleACPIPlatform.kext/Contents/PlugIns/AppleACPIPowerSource.kext/Contents/Info.plist
5. press / (and don't press any thing else this will enter search mode)
6. write: com.apple.driver.AppleACPIPlatform and press enter, it will locate the driver line
7. using the keyboard arrows goto the next line
8. press i (in order to enter edit mode)
9.change the value 1.1.0 to 1.2.1
10. press escape from the keyboard
11. press : (enter prompt mode)
12. write: w! (and press enter, it means write to disk even if read only file)
13. press : (to enter prompt mode again)
14. press q (to exit vi editor)
15. repeat steps 4 - 14 for the files:
/System/Library/Extensions/AppleACPIPlatform.kext/Contents/PlugIns/AppleACPIThermal.kext/Contents/Info.plist
/System/Library/Extensions/AppleACPIPlatform.kext/Contents/PlugIns/ACPIPS2Nub.kext/Contents/Info.plist
16. download this file to your Downloads folder
17. write: mv /System/Library/SystemConfiguration/PowerManagement.bundle /System/Library/SystemConfiguration/PowerManagement.bundle.10.5.2 (it will backup your old Power Management bundle)
18. write: cp -R ~/Downloads/PowerManagement.bundle /System/Library/SystemConfiguration
19. write: chown -R 0:0 /System/Library/SystemConfiguration/PowerManagement.bundle
20. write: chmod -R 755 /System/Library/SystemConfiguration/PowerManagement.bundle
21. reboot
22. from finder goto folder: /System/Library/CoreServices/Menu Extras
23. double click the file: Battery.menu

thats it, you should see the power icon in the menu bar,

Enjoy the power.

Thursday, April 10, 2008

Milonic Menu Added to Blog


i added a Menu to the blog that will allow finding posts easily from every page by category,

this menu is from Milonic, it can be bought or added free for non-profit sites,
the only requirement is to add a link to them on every page that this menu appears,

i added mine at the bottom of each page, it is pretty good, it supports many browsers (let me know if you are experiencing problems), they have a page of samples and it is loaded with all sorts of menus,

hope this helps a little more in getting to the proper information.

Enjoy.

Wednesday, April 2, 2008

Interface changes (Mac Themes)

is there a possibility to tweak Mac theme? (why would you like to?)


well, according to many articles there is no way to do it since OS X has released.
up to Mac OS 9 mac OS was a UI tweakers paradise, but since OS X was released all tweaking abilities, API, and related utilities was discarded, not supported, hidden using private access etc. (example for such article), later when Leopard arrived even OS X applications that some how managed to work (mostly by accessing unsupported and private APIs) stopped working.

OS X Tiger 10.4.x had several applications like: WindowShade X, ShapeShifter, FruitMenu, ofcource no application is worth without a good theme/visual style/icons... collections.

here are some sites to support these applications:
Win Customize (although mostly for windows still icon is icon, wallpaper is wallpaper)

what about Leopard?
since Leopard is built out of applications such as "Dock.app", "Finder.app"..., and the applications are folders and can be browsed using "Show Package Contents", you will find in almost any application (or kext or bundle or action or ...) a folder named "Resources", it will contain images, plist XML files, Strings, etc., color, font, size definitions, sounds, icons etc. will reside here as a resource.

if you change many of these OS characteristics you end up with a different look and feel or theme of leopard.

for instance you can check the content of resources folder found at Finder like this:
  1. goto folder "/System/Library/CoreServices"
  2. right click file: "Finder.app"
  3. select "Show Package Contents"
  4. from the new finder window go in to folder "Contents"
  5. enter folder "Resources"
you can find and replace the file "burnableFolder.icns" with other icon
from that point on your icon will display differently.


but since we don't like to work manually, we need some theme tweaking apps/utils, luckily that is exactly what i am going to cover.

CandyBar

first application is CandyBar the most popular application that knows how to change icons, dock icons, system icons, browse icontainer, etc.


you open up a window that display icons that your current system has and icons that you can replace to. you can add icons of your own, downloaded, you can at any time restore the default icon of each changed icon, it knows to relaunch the dock/finder application when needed (if you allow it), there is a trial version, and it is really easy to use.
you can change the look of your dock for instance as displayed in this post.

here is my resulting Dock:

here are several example of my tweaked icons using CandyBar:


DockColor
next is DockColor, a very very straight forward application, it doesn't get simpler then this.
it is a color picker with a image displaying the Dock surface, you choose the Dock color you want and press apply, thats it (beside of allowing by entering your password).
take a look at the result:


Palette
another good application to change the dock colors is "Palette" it has the ability to control the dock colors with more details such as color opacity, surface image opacity, if the dock frontline is colored with the same color etc.
Palette can also change gradually the translucency of the menu bar (10.5 and 10.5.1 only), use round corners for the menu bar, and change stack icons. the only annoying thing is that the trial version leave text on the dock (i would prefer time period limit) so it is unusable for this purposes.
here are several dock examples:


LeopardDocks
"LeopardDocks" started as a site that display how to tweak the dock and then uploaded many examples and designs, then they came out with LeopardDocks application (was written by "William Spong") that allows you to change the dock look and feel, by downloading a zip file from the "LeopardDocks site" and plug them into the application and change your dock.


one more thing you can do with LeopardDocks is to add a separator between running applications and permanent dock icons, well actually it is an icon that is invisible so you can move it around and even drag it out side of the dock in order to remove it from the dock.


Stacks Drawers
if we are talking about the dock then you need to take a look at the "Add Drawer to Stacks" post that display how to add drawers to the stacks. also i stumbled on this post that is very detailed on the graphical side of creating the drawers.

Displaperture
this application is very weird, its probably for Mac veterans, way back when apple display screen had round corners, not sure if on purpose or outcome of old technology, well if you are one of the old mac users and miss your screen round corners, or just think it's funky then download it from here, run it, choose the corners you would like to be round, scroll the slider to the amount of roundness it needs to be, and press quit. next time you run the application the round corners appears and the application window will not. if you want to setup or quit, just double click the application icon again and the window appears.


what about some content?
well there are a lot of sites that supply icons, wallpapers, stacks icon and application pimping sets. here are some examples:

we can also add some command line defaults tweaks:
remove Finder Buttons background
write in terminal:
defaults write "Apple Global Domain" CUIAllowDebugPrefs 1
defaults write "Apple Global Domain" CUIDisableArtFile 1
killall Finder

instead of this:

you should see this:

if you decide to do that you can manually change colors of Cocoa applications in mac (like Finder, Safari, etc.)
you need to go to the folder:
/System/Library/PrivateFrameworks/CoreUI.framework/Versions/A/Resources/AquaUI.bundle/Contents/Resources

and you can edit and change colors of PNG files especially with the word Material in the files name, the previous written terminal commands cause the mac to work using the vector graphics engine that draws its resources from this folder, the material files help mac to decide how a certain color looks if light is dropped in front of an object and what gradient color to use in each corner and angle, also other files used for layers and transparency (alpha) etc.

look at this example called Milk-Like look and feel created by another user on this post:

also look at this example a more darker look and feel (notice the close resize minimize buttons):
Note: this will hit your performance badly.

Change Finder Background
  1. open Finder Window
  2. right click an empty area
  3. choose "Show View Options"
  4. from the lower part (Background) choose Color (or image)
  5. click on the white color box and choose color
  6. press "Use as Defaults"
  7. close the popup
Note: this will work only in Icon View!

Change Selection Color
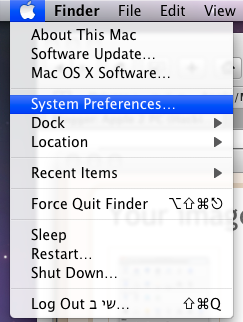
  1. from the apple menu goto "System Preferences"
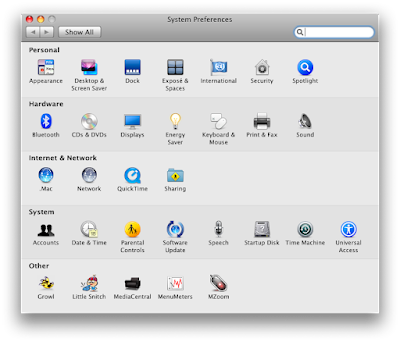
  2. enter "Appearance" tab
  3. change "Highlight Color" to whatever you want

Example of two results i got:


Enjoy the colors.

Friday, March 28, 2008

Enable/Disable Translucent Menu Bar

this is the way to enable or disable the translucency of your menu bar (10.5.2):


1. from the apple menu choose "System Preferences..."


2. click the "Desktop & Screen Saver" icon


3. check or uncheck the lower check box "Translucent Menu Bar"


Enjoy.

How to make menus transparent/translucent in 10.5.2


One of the annoying upgrades you got in 10.5.2 is the removal of translucent menus, many people complained about the transparency of the menus and menu bar, thank god the menu bar transparency can be enabled disabled (look in post for how to), but apple forgot about the menus,

actually if you look closely the menus are translucent but barley something like 5% transparency.
so in order to get them back this is what you do:

1. download the attached files or goto this address and get the 3 files.
b. CoreUI
2. save the files into a folder on the desktop named: "DownloadedFiles"
3. enable root user and login in this way:
a. go to Applications->Utilities->Directory Utility
b. if the lock icon is locked then click it, enter your password 
    when requested and press OK
c. from edit menu select "Enable Root User"


d. if you don't know the root user password change it from the 
    Edit menu->"Change Root Password..."
e. log out from your user
f. use the new "other..." option appears in the login window in order to 
    login as root and the password you set
4. another way to turn root user login on is to do this:
a. open terminal and write these lines:
b. sudo -s
c. enter your password and press enter
d. passwd root
e. enter a password
f. re enter the password
g. logout and use the new "Other..." option from the 
    login window and login as root with the password you entered
5. once logged in as root execute these lines from the terminal:
sudu -s
[enter your password and press enter]
mkdir ~/Desktop/Backup
chmod -R 777 ~/Desktop/Backup
mv /System/Library/Frameworks/Carbon.framework/Versions/A/Frameworks/HIToolbox.framework/Versions/A/HIToolbox ~/Desktop/Backup
cp ~/Desktop/DonwloadedFiles/HIToolbox /System/Library/Frameworks/Carbon.framework/Versions/A/Frameworks/HIToolbox.framework/Versions/A
chmod 755 /System/Library/Frameworks/Carbon.framework/Versions/A/Frameworks/HIToolbox.framework/Versions/A/HIToolbox
chown 0:0 /System/Library/Frameworks/Carbon.framework/Versions/A/Frameworks/HIToolbox.framework/Versions/A/HIToolbox
mv /System/Library/PrivateFrameworks/CoreUI.framework/Versions/A/CoreUI ~/Desktop/Backup
cp ~/Desktop/DownloadedFiles/CoreUI /System/Library/PrivateFrameworks/CoreUI.framework/Versions/A
chmod 755 /System/Library/PrivateFrameworks/CoreUI.framework/Versions/A/CoreUI
chown 0:0 /System/Library/PrivateFrameworks/CoreUI.framework/Versions/A/CoreUI
mv /System/Library/PrivateFrameworks/CoreUI.framework/Versions/A/Resources/SArtFile.bin ~/Desktop/Backup
cp ~/Desktop/DownloadedFiles/SArtFile.bin /System/Library/PrivateFrameworks/CoreUI.framework/Versions/A/Resources
chmod 755 /System/Library/PrivateFrameworks/CoreUI.framework/Versions/A/Resources/SArtFile.bin
chown 0:0 /System/Library/PrivateFrameworks/CoreUI.framework/Versions/A/Resources/SArtFile.bin
6. logout from root and login back into your user your Done!

in order to reverse the procedure copy the backed up files into the original location and execute the chmod and chown lines for every one of them, logout and get back into your account.

Note that if you do not execute these lines using root account you may see all the icons of Finder, Safari and other apps messed up like this:


some people reported that the menu bar translucent enable disable feature disappeared, some complained that FTP and SSH stopped working, so keep your backed up files until you are satisfied that this change suite you.

I first read this post here.

Enjoy

Monday, March 10, 2008

Add Icons to Menu Bar (Tweak Series)


if you read this post (subtitle "Rearange MenuBar") then you know how to remove icons from the menu bar,
so this is the opposite, how to add more icons, (or restore them if you removed by mistake).

in Finder goto folder:
/System/Library/CoreServices/Menu Extras

in it you will find files with the extension: "menu"
if you double click those files each and every one of them will add an icon/button to your menu bar.

example of what is there:
TimeMachine.menu (button for time machine actions)
Sync.menu (for .Mac sync)
Fax.menu (printer and fax)
Volume.menu (restore volume button)
Battery.menu (battery meter button)

these are just example there are many more.

Enjoy.

Wednesday, February 13, 2008

Bluetooth problem (after boot icon disabled) - solution inside

there is yet another problem with hackintosh and bluetooth (at least one i experience), the symptoms are: when you finished booting the bluetooth icon in the icon bar is disabled


enabled icon looks like this:

disabled icon looks like this (but this is a good disabled (initiated by user and can be reversed) 


another one that display an X in the middle of the icon to indicate the bluetooth could not be started there it is:


so if you are experiencing such error then it comes with a side effect:
the cpu is at 100% all the time since the bluetooth demon keep on trying to initiate it and it fails (so its kind of an infinite loop that will never end due to bluetooth crashes).

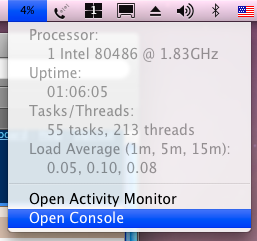
to validate if your CPU is 100% or not you may see it in the icon bar as well it looks like this:

you may have a different set of icons and if the percentage is showing something else (like memory or network IO) or not displayed at all then: 
goto System Preferences...,


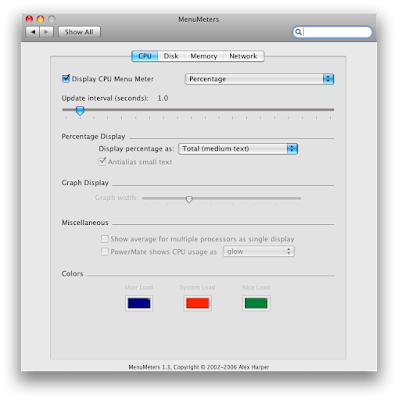
at the "other" section click on Menu Meters


at the CPU tab select the checkbox that say "Display CPU Menu Meter"


and thats it, if you do not have the Menu Meter option at all you may download it from here and install it.

lets move on:

if the CPU is really in the 100% zone (or near it) then it means you suffer from bluetooth (or any other hardware) crash and retry effect, next we need to find out if it indeed crash or something else is causing the 100% (for instance another hardware process crash - not bluetooth), for this we need to open the system console (that is the GUI that allows you to see all mac logs) to open it use one of these methods:

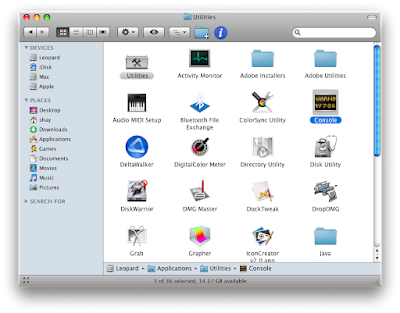
1. open Finder, Goto Application, there you will see a folder named Utilities, and in it the icon for Console (Double click it)


2. click the CPU Meter icon and choose the "Open Console" option


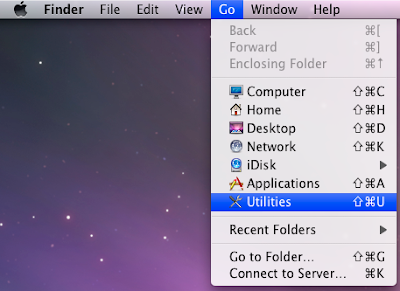
3. from the finder menu click on: Go->Utilities and double click the Console icon


4. go to Finder process (alt tab or click on the dock icon or click on the desktop so no process is selected...) and then use keyboard shortcut: Shift+Command+U (in hackintosh: Shift+Winkey+U or Shift+Alt+U), and then double click the Console icon

there are several more options such as from terminal and spotlight... but you get the point (mac is awesome)

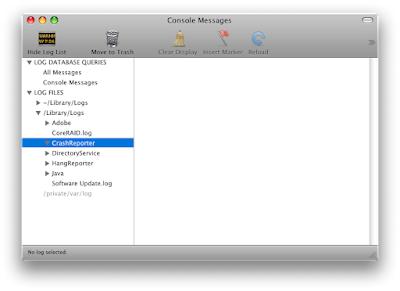
so after Console is up you should see screen looking like this:


note that i have highlighted the CrashReporter tree node, if you have any processed crashed it will leave a log file with the process name and the crash date under this node, so if you have a log file starting with the word: "blued" that means the blued process crashed (it is the bluetooth demon process name b.t.w. demon is mac equivalent to windows service).

so if this is the case then you should be seeing a lot of them (they crash and retry every 2-5 sec), you may see other crash report logs as well for this post purpose ignore them.

inside that log you may see info regarding why the process has crashed (thread dump, memory maps, exception type and description) you can google for it and you may be lucky enough to find the reason and the solution, if you don't understand it then leave it alone and try my suggestions:

solutions (kind of):
1. you may try to reboot several times eventually it will get it up and running (lame but works)

2. another flavor of this solution is a kind of voodoo but it has tech explanation, while rebooting press enter several times (you may also hold it until boot finished but do it in bursts), this will work since one of the main reasons for the bluetooth or any device not being initialized at boot time is the PC power managements system it is automated and during boot it decide if to transfer power to a certain device or not depending on the use of it (if the address is used if the IRQ is called etc.) sometimes the mac OS has short fuse and if the device does not respond in time it will think the device is not available, the process will crash and relaunch it self retrying, but the BIOS power management system will not power up the device after boot time and that is why the problem occurs, so the enter (or any key) put interrupts for the console which kind of slows down things allowing the power management to power up the device.

3. if you have the option disable the auto power management from the BIOS i don't have that option but i have the wake up event so i disabled it hoping that it will cause the power to be always on (laptop tries to save power this way).

4. one other option is to rename the plist (config) file of the bluetooth process it reside in ether:

/Library/Preferences

or:

~/Library/Preferences


and the file name is:

com.apple.Bluetooth.plist

and reboot, leopard will re-create it when the bluetooth try to start.

*** Edit *** Disregard solution 5 it made me tons of problem (i am trying to finilize it so it would work and only then i will say it is a stable solution or not)
5. another solution is to remove the bluetooth installation and reinstall it, the way to do it is to rename/remove/move the files related to bluetooth (long list) and download the package from apple and install it.

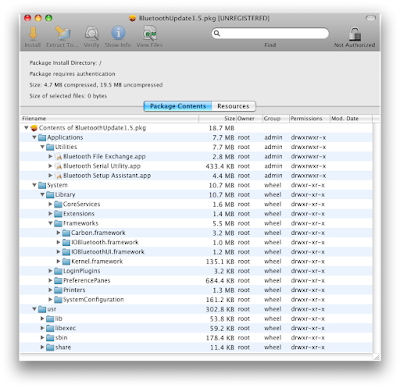
we need to remove the files since the package will not install if there is a driver installed already (unless apple site version is newer), the file list you can get from the package content using Pacifist (an application to extract and browse install packages),


i suggest to use pacifist to extract all folders to some easy to access folder for instance: ~/temp and manually install (mining copy and overwrite existing files from single user) this is the way to do it:

reboot

before apple gray boot screen appears press:

F8

at the prompt write:

-s

this will boot into a shell (A.K.A single user mode) then write:

/sbin/fsck -fy

press enter (this will check the disk before mounting it - this is not mandatory but a good practice)
then write:

/sbin/mount -uw /

this will mount your disk and now you may copy all extracted files from the package and replace existing ones on the disk using a cp command like this:

cp -R ~/temp/Application /Application
cp -R ~/temp/System /System
cp -R ~/temp/usr /usr

it is important to do it in single user mode so kext and process won't be loaded and the files can be overwritten. after you finish write:

exit

and it will continue to load into leopard

link to the apple bluetooth package:

http://www.apple.com/support/bluetooth/ (download only software update not firmware since firmware is for hardware for real macintosh not hackintosh)
*** End Of Edit ***

6. last and not a solution at all but it will free your CPU is to disable the load of this process
first way (ugly) is to rename or deleting or moving the process blued, so when anyone tries to lunch it will fail finding it, the blued process file can be found at:
/usr/sbin/blued 

you can open terminal and write:
sudo mv /usr/sbin/blued /usr/sbin/blued.old

then key in your password and reboot.

another way (better) to achieve this is to disable the load of the blued process by removing it from the demon load folder, the folders that contains demons to load during boot time are:
/System/Library/LaunchDaemons
/Library/LaunchDaemons


the script you need to remove is called:
com.apple.blued.plist

you can also remove the file:

com.apple.blued.launchd


from:
/var/run

so it won't be restarted (if it got up for some reason)

well thats it, if the problem will return i will add solutions i found/try in order to fix it,
hope it will fix your bluetooth pain in the...

 
the menu is from: Milonic DHTML menus