Monday, September 26, 2011
OSX86 online Support
Saturday, November 1, 2008
Still waiting for root device II

This post is a continue part of my previouse "Still waiting for root device" post that covered several solutions including:
- use RD=DiskXsY darwin switch
- BIOS configuration
- flag OSX86 partition as bootable
this post will display more good options to get pass this error, starting with the simplest:
1. Download another distribution
the simplest solution is sometimes the less obviouse, although you probably thinking "what good can another copy of Hackintosh do for my hardware compatability error?" well the thing is that OSX86 is a shrinked OSX with hacked, tweaked, opensource drivers for a PC, this what makes you PC compatible with OSX, one distribution does not include the same drivers as the other, also versions of the same published contains different drivers, for instamce Leo4All_v2 may work on your machine but Leo4All_v3 might not. so be sure to download as much distributions you can until your problem is solved.
2. Plug USB/Firewire drive (even DiskOnKey)
another simple solution is to plug an external drive like a USB or Firewire drive or even a USB DiskOnKey (size doesn't matter, in this case anyway) in your USB port and reboot the system, with the Hackintosh OSX86 DVD in the DVD drive, once the darwin countdown appear press F8 in order to get the boot prompt and use the RD=DiskXsY switch (switch use is explained in this post in greater details) and point the disk number and partition number to the external drive. this solution is only to get the installtion started, not a permanent solution, after the installation is running you can choose different combination of drivers until the installed system will load without the need to use the USB plug trick.
3. Use External DVD
if you can access external DVD drive or a SATA drive then try using it, most of the times the problem is hardware inconsistency with the driver installed on the DVD, this means that you might have a DVD that the booting driver set (this set is different then the driver it contains in order to install on your system) includes SATA harddrive driver, and your harddrive might be SATA but the DVD is IDE, and ofcource it can be vice versa, that the HD is IDE and the DVD is SATA and driver is one of them (IDE/SATA), so try to make it consistent, use the same HD and DVD type (even by plugging external DVD so it will be USB instaed of SATA or IDE) and find a distribution that will load them.
4. Play with Master/Slave settings
sometimes when your PC contains IDE hraddrive and IDE DVD you need to play with the master slave configuration (use this option only if you know what it means, this option involve openning the PC case and play with harddrive/DVD jumpers)
5. More darwin swiches to try
there are more swich you can try beside rd=diskXsY, you can read about them in this post, try these next swiches: platform=X86PC -x -f cpus=1, try them in different combinations until you succeed.
6. Create an HFS+ partition prior to the installation
if the installation cannot find your root device although you tried previouse sulutions then try creating an HFS+ partition and point to it using the rd=diskXsY at boot time.
from windows create a partition of AF type (HFS+ type), do it like this:
- from windows press Start->run and write: cmd and press enter
- write diskpart and press enter
- write: list disk (it will display all available HD)
- select the number of the one you want to install Leopard on like this: write: select disk NUM_OF_DISK and press enter (replace NUM_OF_DISK with the number of the disk you want)
- next write: list partition and press enter
- it will display all the partitions on that disk, now delete the partition you planed to install on like this: delete part NUM_OF_PART and press enter (replace NUM_OF_PART with the partition you wanted to install leopard on), if you don't have such partition then skip to the next part
- create a partition of the AF type like this: write: create partition primary id=AF and press enter
- write: active and press enter
- reboot and try to load the installation from the DVD again
7. Copy the Extensions folder from DVD to the Harddrive
this solution is for all of you that got the "Still waiting" error after the installation processed finished and first reboot occurred. if this is your case then it means that you have succeeded to boot into the DVD inorder to install (so the correct drivers for your system reside in the DVD boot extensions folder) but when you finished installing the drivers you selected they just won't boot and the Still waiting for root device appears, then all you have to do is to copy the DVD boot extensions folder into your installed copy and by that boot from your harddrive using the DVD drivers, do it like this:
boot from the install DVD, from utilities menu item select the terminal and write the following commands, but replace the word Leopard with your installation partition name (you set it during installation):
cd /System/Library
mv /Volumes/Leopard/System/Library/Extensions /Volumes/Leopard/System/Library/Extensions.bak
cp -R Extensions /Volumes/Leopard/System/Library
cd /Volumes/Leopard/System/Library
chmod -R 755 Extensions
chown -R 0:0 Extensions
after this the system should be able to boot on its own, you may need to flag the partition as bootable read how to do this here.
8. Change the ATA driver on the DVD
this last suggestion is very good but very hard to nail. it involves hacking the IOATAFamily.kext. this is the kext that is responsible for the attached hardware on your machine (ATA= AT Attachments, SATA = Serial ATA) like IDE hard drives or CD/DVD we will insert your controller Vendor ID and Device ID to it. follow these instructions:
- boot into windows
- open control panel
- find your Disk controller
- right click and choose properties
- chose the Details tab
- the first line contains something like this: PCI\VEN_30BE&DEV_004A...
- Vendor id is the 4 characters after the word: VEN_
- Device id is the 4 characters after the word: DEV_
- write on a paper the sting like this: 0x + VendorID + DeviceID (without plus or space for instance this example should be like this: 0x30BE004A)
- next stage involve using MacDrive and some util that will mount your install DVD ISO file (like alcohol), you need to mount the DVD after installing MacDrive that allows you to access Mac file system,
- cd into the folder:
- make sure you have at least these folders in there: AppleGenericPCATA.kext AppleOnboardPCATA.kext IOATAPIProtocolTransport.kext AppleIntelPIIXATA.kext AppleVIAATA.kext AppleNForceATA.kext IOATABlockStorage.kext
- also make sure you have the folder: /System/Library/Extensions/JMicronATA.kext (if you use a JMicron controller and IDE hard drive)
- next open in an editor the file: /System/Library/Extensions/IOATAFamily.kext/Contents/PlugIns/AppleVIAATA.kext/Contents/Info.plist
- find this tag: <>IOPCIPrimaryMatch< /key >
- after it you will find a tag: <> with allot of strings like you wrote on the paper in it.
- add your string (one you wrote on the paper, but first make sure it is not already there, if it is - abort this step (Solution 8) completely) with a space between it to the others (location isn't matter as long as it is in the tag like the others)
- save it
- delete the file: /System/Library/Extensions.mkext
- save the ISO file with these changes, burn it onto a DVD, boot from it with -F at the darwin prompt.
hope all these solutions help you,
ShayBC.
You might want to read these related posts:
Still waiting for root device
Darwin Boot Options
Download Hackintosh OS X Leopard
Blinking cursor after OSX86 install
Restore bootable partition
Tuesday, October 28, 2008
Make secondary install bootable

This post explain how to make a Leopard (hackintosh) secondary install bootable, any computers that has more then one OSX86 installd have a primary install and secondary install, a secondary install can be install on USB driver, Disk-On-Key, another partition, as long as you can boot more then one OSX86 on that computer, that means that you will load the working OSX86 and from there repair the non-bootable OSX.
for only and primary install read this post.
please note that this proccess will work for MBR and GUID partition scheme, if you don't know what this means, or want to learn how to check which of the two partition scheme you have then you can read this post.
in order to make your secondary partition bootable, please follow these next steps:
1. boot into your working OSX86 partition
2. download this file and extract it, for this post i will extract it in the root folder / so now i have a folder named: /MakeBootable
3. make sure you know what partition scheme you have (MBR or GUID)
4. open terminal (Applications->Utilities) and write the following commands
5. sudo -s (and write your password)
6. cd /MakeBootable (this is the folder you downloaded and extracted at step 2)
7. diskutil umount force /Volumes/Leopard (replace the word Leopard with your non-bootable drive name)
the result should look like this:
if you don't know the name of the drive (that is non-bootable) then you can write this:
mount -t hfs
then you get a list of all known drives in your system the result should look like this:
/dev/disk1s1 on /Volumes/Leopard (hfs, local, journaled)
8. now write the command:
dd if=./mbr/boot1h of=/dev/rdiskXsY bs=512 count=1
(replace the letter X with your non-bootable drive number and the letter Y with your non-bootable partition number, in this example it will be: rdisk1s1)
also if you have MBR partition scheme then leave the word mbr as written in the example, if you have a GUID partition scheme then write guid instead of the mbr word then it should look like this: dd if=./guid/boot1h of=/dev/rdiskXsY bs=512 count=1
the result should look like this:
1+0 records out
512 bytes transferred in 0.008498 secs (60250 bytes/sec)
dd if=./mbr/boot0 of=/dev/diskX bs=400 count=1
also if you have MBR partition scheme then leave the word mbr as written in the example, if you have a GUID partition scheme then write guid instead of the mbr word then it should look like this: dd if=./guid/boot0 of=/dev/diskX bs=400 count=1
the result should look like this:
1+0 records out
400 bytes transferred in 0.018606 secs (21498 bytes/sec)
10. write the command:
diskutil umount force /Volumes/Leopard
(replace the word Leopard with your non-bootable drive name)
the result should look like this:
Volume DiskOnKey on disk1s1 forced unmounted
11. write the command:
the result should look like this:
HFS+ filesystem detected
Looking for 1 word free
reading 4096,4096
Marking word 196
writing back 4096,4096
allocated blocks 32 at start 6272
now the disk should be bootable and should be able to boot on his own, you may do the steps in this post or this post as a completeing procedure in order to make sure that the OSX is the first partition to boot from.
Shay.
Sunday, October 19, 2008
Make primary install bootable

how to make a primary installation OSX partition bootable?
sometimes you are going to need a solution for a non bootable partition that was previousely bootable or after successful installation the partition remain non-bootable.
please note that the solution sugested here is for a primary installtion, which means it is for the main and only OSX installation on your computer and you have no way to boot into another OSX system. although it is possible to restore a secondary OSX installaion to be bootable again using this method, there is a simpler solution and it is described at this post.
primary installaion = the first and only OSX installation on your computer.
secondary installation = second (or greater) installation of OSX type (means you have more then one OSX installed on your computer) a disk-on-key/external USB/Firewire drive can be considered a secondary installation for this matter.
also note that this post is for MABR partition scheme (and not for GUID partition scheme). if you don't know what MBR or GUID partition scheme means then please read this post first.
in order to make an OSX86 partition bootable follow these next steps:
1. boot leopard DVD into Single Mode (you can red how to do that here)
2. type the next commands at the command line:
cd /usr/standalone/i386
ls
the result of these two lines should be a list displaying all the files in the i386 folder,
please make sure that at least these files exist:
boot0
boot1h
boot_v8
startupfiletool
if these files does not exist they can be copied from the installation DVD, in order to copy the files from the DVD use the method explained in this post. the files can also be downloaded from here.
3. if this is the case then type:
dd if=./boot1h of=/dev/rdiskXsY bs=512 count=1
(replace the X letter with the drive number that the OSX is installed on, the first drive is 0 the second is 1 and so on. replace the Y letter with the OSX partition number, the first partition is 1, the second partition is 2 etc. example: my computer has only one drive so my drive number is 0, and i have windows installed on the first partition and OSX on the second partition, so my OSX partition should be 2, therefor my parameter should be: rdisk0S2)
you should see an output result similar to this:
1+0 records in
1+0 records out
512 bytes transferred in 0.008498 secs (60250 bytes/sec)
4. now type this command:
dd if=./boot0 of=/dev/diskX bs=400 count=1
(replace the X letter with the OSX drive number, first drive is 0, second drive is 1 etc. also please note that it is diskX and not rdiskX as the previouse command)
you should see an output result similar to this:
1+0 records in
1+0 records out
400 bytes transferred in 0.018606 secs (21498 bytes/sec)
5. type in the next command:
./startupfiletool -v /dev/diskXsY ./boot_v8
(replace the X with the number of the OSX drive and Y with the number of the OSX partition)
you should see an output result similar to this:
HFS+ filesystem detected
Looking for 1 word free
reading 4096,4096
reading 8192,4096
reading 12288,4096
Marking word 510
writing back 1288,4096
allocated blocks 32 at start 81856
now the disk should be bootable and should be able to boot on his own, you may do the steps in this post or this post as a completeing procedure in order to make sure that the OSX is the first partition to boot from.
Shay.
Thursday, June 26, 2008
What is MBR and GPT?
If you have encountered a disk problem in hackintosh then, you might came across the terms MBR which is an acronyms for Master Boot Recored and GPT which is an acronyms for GUID Partition Table.
every hard drive is separated into partitions, even if it has only one partition it has a table describing that mapping, that mapping contains data like: how many partition on the drive, what is the size of each partition, what is the starting address of each partition etc. the partition table info can be described in two manners (actually more but we are interested only in these two), the one is MBR and the other is GUID, this manner is named Partition Scheme.
the partition schemes differ from one another by the way it holds the addressing of the partitions (CHS vs LBA), and by the max size they support for each partition, where is the boot recored kept etc. MBR is used in PC that uses a BIOS, GUID is used in computers that support EFI (like Mac). you can read more about it here.
when you install a hackintosh you need to prepare a partition for OSX, if it is a new partition on existing (already partitioned, from windows) disk, then there is no doubt you have an MBR partition scheme (well 99%), but if you prepare the disk from the OSX installation using the Disk Utility, then you have an option to choose from 3 types (MBR, GUID, Apple Partition Table Scheme).
Note 1: Apple Partition Table is not good scheme for a bootable HD for hackintosh, it is mostly for PPC.
Note 2: if you choose to repartition your hard drive from the Disk Utility or any other tool, it will cause loss of all information on that hard drive (including any Windows flavor you have installed on it).
you can repartition your hard drive from leopard installation or existing leopard installation in this way:
open Disk Utility.
right click on the drive you wish to partition from the left hard-drive tree, and choose the "Partition" option.
from the "Volume Scheme" drop-down menu choose the number of partitions you would like to create on the disk.
from the lower "Options..." button choose the desired partition scheme, i would suggest MBR.
if you would like just to know what partition you are currently using then open "Disk Utility".
and from the left hard-drive tree choose the drive you wish to query, (Note: the drive and not its partitions)
then look at the right lower corner next to the label: "Partition Map Scheme" and you will see your partition scheme (Master Boot or GUID)
Shay.
Wednesday, May 7, 2008
"Still waiting for root device"
This annoying statement ususally comes up befor DVD can boot or after installation before the OSX boots for the first time.
What does this error mean?
well it means that the OS is set to boot from a drive and partition that does not exist.
for instance the Darwin boot loader is talled to boot from Disk1 (Disk 1= second hard drive (starting from 0)) and there is no such disk.
What can you do?
if you know the number of your Hard Drive then at the Darwin prompt (after boot press F8) write: rd=DiskX where X is the number of your OSX hard drive.
for instance if your hard drive is 0 (zero is the first hard drive) then write:
rd=disk0
if you do not know your hard drive then there is a try and error method of trying all the disk possibilities on your computer starting with: rd=disk0 then rd=disk1 then rd=disk2 then rd=disk3 etc.
another good option is to disconnect other HD and leave the OSX HD as first and write disk0.
once you succeed and don't want to write the rd parameter every boot, then write it in your boot plist file.
this is a file that configure the system boot parameters. the file can be found at: /Library/Preferences/SystemConfiguration
the file name is: com.apple.Boot.plist and you edit it as root and change the Kernel Flags value and add to it the rd parameter like this:
- open terminal
- write: sudo -s and press enter
- enter your password when asked and press enter
- write: vi /Library/Preferences/SystemConfiguration/com.apple.Boot.plist and press enter
- in the vi editor use the arrow keys on the keyboard and navigate the cursor to the tag: after the <key>Kernel Flags< /key > line.
- the string tag might be empty or not, if it is not empty then add space and then write: rd=diskX where X is your hard drive number.
- press keyboard button Esc (in order to exit insert mode)
- write: :wq and press enter (notice the : sign)
- then reboot and thats it
- boot from the install DVD into single-user mode
- flag any partition other then the leopard partition as bootable
- then you reboot, again from the install DVD into single-user mode
- next flag back the leopard partition
Friday, April 11, 2008
HFS+ partition type changed - what to do?
if you have for some reason a partition that is not recognized as HFS+ but it is (for instance if you tried to resize using Gparted and the HFS+ converted to something else), this is what you do in order to fix it:
enter fdisk, once you have entered fdisk and pressed p for print it will display a table with partitions details looking like this:
Note the second column (id), it is telling us what is the type of the partition in a hex representation. the HFS+ partitions should have AF as ID.
if it is not AF and the last column does not say HFS+ then use the command:
setpid X (where X stands for the partition number)
then the fdisk will show the partition table just for the X partition and ask for the partition ID you want to set like this:
write AF as the ID and press enter.
u (stands for Update)
w (stands for write)
it will tell you that you need a reboot like this:
write y (stands for yes)
q (stands for quit)
reboot, your done.
Enjoy.
Restore bootable partition
You have recently installed kext, application, update, another OS on a different partition and after boot all you get is a blinking cursor, and no darwin boot, and system not booting.
- how many drives do you have
- how many partition on each drive
- what OS and File System is installed on each Partition
- what OS you would like to restore as primary boot loader
first solution is accomplished using the "GNU Gparted Live CD", it is free Linux based application, you can download it here as an ISO file, you need to burn the iso file on to a CD and boot from it.

in the upper graphic parts you see square shapes that each represent a partition, above them there is a drop down that display the currently selected hard drive (in this case hda and its size is 37G), in linux (as in mac) drive is represented as file under folder dev, so the first drive is: /dev/hda.
if you choose from the drop down another driver it will display that drives partitions.
the lower table display the partitions in more details, you can see in this example that the first partition is NTFS, and it has the boot flag marked, that means that the NT file system will be booted from.
one of the thing you can do, is set a partition to being a bootable by setting the boot flag to it. you do that by right clicking with the mouse on the desired partition and choosing "manage flags" , from the pop up window check the boot flag check-box, close the window and click the "Apply Changes" button after it finish, reboot, and your HFS+ file system should be bootable again.
Solution 2:
there is another option to do this from command line using the fdisk utility available from the leopard DVD.
steps:
- insert the Leopard install DVD and boot from it
- at boot time press F8, and you will see the darwin boot screen
- write -s and press enter this will enter "Single User" mode
- execute the two lines that appear there regarding fsck and mount as described in the "Single User" post.
- next enter these commands:
then in the fdisk utility write ? for list of commands (help screen)

write p (short for print) and press enter then it will display a table of disks and partitions
find your HFS+ partition and remember its number (if it is the first partition it will be 1)
next write: f X where X stands for the HFS+ partition probably 1 if it is the first partition,
next write: u (short for update) and press enter
then write: w (short for write) and press enter
lastly press q (quit)
then restart and the HFS+ partition should be bootable again.
so for summary, the commands should look like this:
boot single mode (after restart press F8, at the prompt write -s and press enter)
/usr/sbin/fdisk -e /dev/rdisk0
if these solutions did not help that means one of two things:
- you have just installed Leopard and did not install Darwin as described in the "Install Leopard" post.
- or for some reason your partition ID has changed from AF to something else causing the HFS+ file system to recognized incorrectly.
the second case can be solved from the fdisk utility instructions in this post.
Enjoy.
(All About) Boot into Single User
- Restart your computer
- Continuously press F8 until you see the Darwin boot prompt
- write "-s" without the quotation marks and press enter (for real mac do this instead)
- you will soon reach a prompt
- note the lines written to the console about fsck and mount
- write: /sbin/fsck -fy
- press enter and then the system should write:
** The volume XXX appears to be OK
or
***** FILE SYSTEM WAS MODIFIED *****
if it is the second option, then repeat the fsck command (6) until you get the first line saying the volume is OK - write: /sbin/mount - uw / this will mount your file system
- thats it you are in "Single User"
Saturday, March 29, 2008
Automate your Apple Darwin Boot flags
- sudo -s
- write your password and press enter
- cd /Library/Preferences/SystemConfiguration
- nano com.apple.Boot.plist
Sunday, March 23, 2008
Install new Kernel / Boot from alternate Kernel
- EFI supported kernel are available at netkas blog links from the irc channel.
- you can also download the latest kernel and its relevant kext from the open source darwin project, compile it, and patch it using netkas EFI patch using this procedure(for more advanced users - not recommended).
b. copy the file from downloaded folder (e.g. desktop) to the root folder
- open terminal
- write: sudo -s
- enter your password when prompt and press enter
- cp ~/Desktop/mach_kernel_9.2 /
- mv /mach_kernel /mach_kernel_9.0
- mv /mach_kernel_9.2 /mach_kernel
- chown 0:0 /mach_kernel
- chmod 755 /mach_kernel
Saturday, March 15, 2008
Install Leopard - iATKOS_v1.0i
this is a continue to the "BIOS Options for hackintosh" post
this post will be a screen-shot guide of how to install Leopard on a PC,
if this is the first post you read regarding this issue please read the previous sections they will save you a lot of troubleshooting in the install process,
this guide is based on iAtkos 1.0i 10.5.1 without the 10.5.2 PPF, the installation DVD i used is an upgrade and require a pre installed Mac, i used for that an iAtkos tiger install, in order to see the tiger installation post refer to the "Install Tiger" post, another solution is to download a full installation of leopard (not an upgrade), i know there is a Kaliway and uphack iAtkos versions of it.
these screenshots comes from my LG W1 Laptop, it has this hardware mounted on it:
- Core2Duo 1.83Ghz x2 (only one working when the other is enabled i get a reboot loop)
- 2G DDR2 667
- 120G SATA HD (can support RAID)
- PCMCIA Texas Instruments Card Reader
- Dual-Layer DVD Burner
- USB 2.0 x4 or USB 1.0 x2 + USB 2.0 x2 (both successfully supported)
- ATI X1600 Mobility (working with ATIinject)
- Sound Card (internal speakers not working)
- 17" LCD
lets begin, first insert the burned DVD (i used alcohol 120% with generic format to burn the copy)
next turn the computer on, so it will boot from the DVD (make sure the BIOS is set to boot from DVD first)
after booting you see a screen similar to this, counting backwards, and notifying that it is loading the Darwin boot loader, allow it to proceed until you see the next gray apple screen
next you see the apple boot screen this should take between a minute to 5 minutes
in the meanwhile connect a USB keyboard (if you are on a laptop it is a good bet that the internal will not work out of the box), in desktop try not to mix mouse and keyboard ps2 with USB, ether both USB or both PS2 (although it can work mixed).
i use a silicon roll up keyboard so it bothers me less (but it still bother)
next you see the 'About' screen of the install and the 'About' message was removed and what left is just "Click Next" message so go ahead an click next
the 'next' button is in the lower right side of the screen
a progress indication dialog appears should take up to 1 minute or so
next a 'Welcome' screen appears and since this is a tweaked leopard install you see the hacker group message here, mine say iAtkos + version, click Continue
next screen should have been the Apple License agreement but here we get the iAtkos group "readme" file content, use only English language and click Agree
now the fun begins, this screen ether display hard drive partition that you can install leopard on, or not most of you will not see the Hard drive icons, don't worry about it we will soon create one that will be visible, and usable, if you see one and want to use it as your install partition then click it and jump the "Darwin Install" step.
next click on the "Utilities" menu from the upper menubar
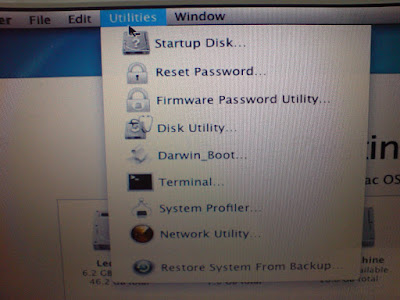
and choose "Disk Utility", the screen will be replaced by the disk utility application
in this screen you see a center section that is empty for the moment and on the left you will see all the disks and partitions available on your PC, on the upper part you see an icon bar that can perfom several operations on the selected disk/partition
select the partition you want to erase (and install leopard on) from the left disk/partition tree, immediately you see the center changes allowing you to see summary info on the selected partition and perform operations like erase, create, format, fix etc.
from the center part of the screen press the Erase tab
choose a volume format, Mac OS Extended (Journaled),
in the name text field write the name of the partition (this is the name of the HD icon on the Mac desktop and the name of the boot partition you will see in the Darwin boot screen, so choose it carefully, i think only English is supported, try not to use spaces in the name and it is Case sensitive), i used Leopard2 in this example, and click the "Erase" button
next you get a popup screen (in mac its rather a scroll down) that asking you to confirm to erase the partition looking like this: (click the erase)
next the partition is erased and a progress bar indication available at the bottom of the screen, after the erase finish you see a complete message and on the left partition/disk tree there is a new icon of the recently formated/erased mac partition (leopard2 in this example), close the "Disk Utility" window and exit to the main install window
Darwin Install:
after the disk formatting you should be able to see its icon in the main screen, do not select it yet we need to finish one more step, that is the installation of the darwin boot loader it is responsible to initialize all the kext(Kernel extension) and boot the system, also we will install the EFI system that will allow to run a vanilla kernel.
from the Utilities menu in the menu bar select Darwin Boot
next the main screen disappear and a terminal window appears elaborating on the procedure, go ahead and read it,
at the end it ask you: do you want to continue, press y
it asks you to write the number of the Hard Drive you want to install Darwin on (the drive that will be bootable and mac will be installed on it) use the drive that you recently erased (it should be available from the data you gathered in an earlier stage), please note that every hard drive number should be added 1 to it so for instance your first driver (number 0) you should enter here 1 instead, etc.
next comes the partition number write the real number (first is 1, second partition on that disk is 2, etc.) (sorry i dont have a screen shot for that one).
last step is to install the EFI (it works on most PCs, if it won't work on yours, just reinstall and skip the EFI part), EFI allows the hackintosh to operate as a real leopard, including Software Update and several kext (drivers), it uses a vanilla kernel code,
so in the next question: "Do you want to install boot EFI" press Y (sorry no screen shot for this one as well).
lastly you will be asked: "Are you sure? " (for all the previous answers you gave), if you answer yes the darwin and EFI (if you selected Yes on EFI question) will be written to the disk and partition you selected, if you answer no all will be discarded and you can redo this part and reselect your options.
write Y, after the darwin install is finish it will write exit, logout, [Process Completed], the install takes 5-10 seconds
after the install is completed we need to flag this partition as bootable, this will allow you to boot from the newly installed partition,
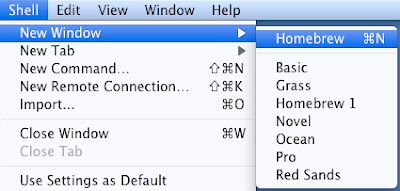
to open a new terminal window from the Shell Menu, choose new Window->Homebrew
a new terminal window appears, enter the fdisk CLI (Command line interface) using this command:
/usr/sbin/fdisk -e /dev/rdisk0
replace the last number (in this example 0) with the your leopard install HD number
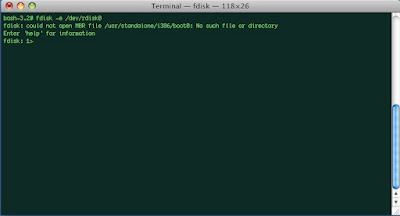
you can use question mard (?) and see the command list
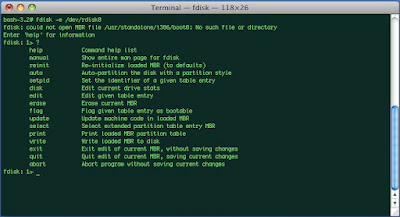
write p (short for print) it will display you with all the available partitions on the selected disk, including details such as size, type etc. you will also see an astrik sign (*) next to the current bootable (flagged) partition, in this example case its 2.
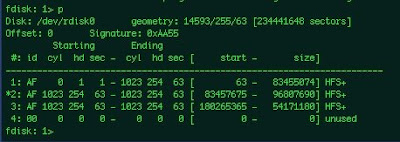
flag your partition to be bootable using the command:
f 1
(f is a short for flag) replace the number 1 with your installed leopard partition
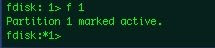
after you do that you can see there is an astrik sign (*) next to your prompt indicating that a change has occurred and no commit has been applied, you can use p (print) again, to make sure that the appropriate partition has been flagged
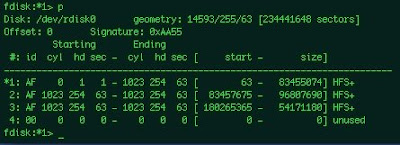
now write u (short for update)
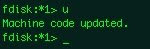
and w (short for write)

the astrik sign (*) has disappeared from your prompt indicating all changes have been applied, you can write q (short for quit)

once finished with the fdisk utility we can exit the Terminal application, you do that by clicking the Terminal Menu->Quit Terminal from the menubar it will bring you back to the main install window
now select the icon of the partition you want to install leopard on (the same partition you erased and named, same one you installed darwin on) and click continue
now you get to the actual install screen (after all the preperation)
in the lower left corner there is a Customize button that, press it.
it opens a window that allow you to select what components to install, if you know what you are doing then check your selection, if you are a beginner with hackintosh select only the ones that are marked in the image, note select EFI only if in "Darwin Install" you selected Yes in the Install EFI question, otherwise uncheck it.
when you finish click on the Done button in the lower right corner
you will returned to the "Install Summary" screen, press the install button
a popup (or scroll down) will appear and perform a checksum on the Install DVD to make sure all the files are correct intact and original, you can select to wait 2-3 minutes, or press skip
after the validation part is done (or skip is pressed) the OS file copy stage begins, this will take time, lay back and relax
the progress window looks like this:
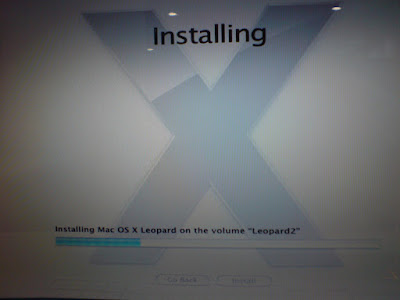
when the install process finishyou get this "Install Succeeded" screen and it will stay this way for 30 seconds, waiting for you to press restart, if you don't it will automatically restart anyway
before it will boot back up, eject the install DVD, you will not need it any more (for this install)
after the BIOS screen press F8 so the darwin boot screen will load
make sure you see the recently installed partition with the name you gave it (my example "Leopard2"), select it and press enter
now you see the apple gray boot screen
if all went well you will soon see (and hopefully hear) the great apple "Welcome video", you cannot press esc and stop it, so enjoy it until it ends and the next customization screen set appears
first screen is the region selection screen, select your region, if you cant see it check the the lower "Show All" checkbox
next is the country selection screen, choose your country, if you cant find it check the lower "Show All" checkbox
next is the keyboard layout screen, select your keyboard layout, if you cant see the one for you check the lower "Show All" checkbox
next screen is important, it gives you the opportunity to migrate data, setup, application etc. from an existing mac installation, if you have an upgrade install DVD version of leopard then you must have an earlier install of mac OS (like Tiger, check the "Install Tiger" post), if you don't have an upgrade install DVD you can choose the last option "do not transfer my information now" and click "continue", but if you have an upgrade version and you have previously installed a Tiger version on this PC then just choose: "from another volume on this mac" and click "continue", note: if this is an upgrade version DVD and you have not installed Tiger after you click "continue" it will go back to the "welcome video" stage and it will do that only 3 times after that the installation will be corrupted.
if you choose to transfer the information from previously installed mac, then this screen appears, asking you to select the data you want to transfer (you must select at least one user), make sure you have enough disk space and click transfer.
a transferring progress indication screen appear, it will take time depending on the size to transfer.
next it will ask you to select your internet connection type and set it up, it can be done but i prefer for first install to do only what has to be configured so i can see the leopard is launching and not that the internet connection has failed the installation, this wizard can always be activated from within leopard,
next it will display the registration sceen, fill in the fields and press continue
now it will warn you about fields you forgot to fill or filled incorrectly or if the email is invalid, ether fix the data (if it will not allow you to continue) or press ok to ignore
next the more questions screen appear asking you where do you use this mac and what describes your uses for it, and you may check the ckeckbox in order to be notified of new sales and new products etc. by email (don't check this checkbox)
next it will ask to send the registration info to apple, obviously you select "register later" and press continue.
next the set the date and time window appears allowing you to set the clock, set it and press continue.
now it will remind you not to forget to register with apple, press Done.
thats it in a minute you will have a leopard system working, now just calibrate your keyboard, so leopard will load the appropriate code for it, press continue.
first it will ask you to press the key next to the left shift,
in my case it is Z, click it once
next the screen changes and ask you to press the key next to the right shift,
in my case it is the question mark key (?) press it only once,
next it should notify you that the keyboard has been identified and allow you to ether press done or change the identification from the options available, (leave it and press done)
next you will see the leopard login window (actually the hackintosh hacked login screen) choose your user enter the password and click login
lastly you should see the leopard desktop and dock.
thats it, if you have problems or questions send a post here, if you succeed send your success story in insanelymac and your hardware setup in the OSX.org HCL Page,
Enjoy your Mac.


