according to several sites and rumors, apple is going to renew the look and spec of the old known iMac, this supposedly should happen in mid of october this year (15/10/2009), the last rumor is comming from AppleInsider:
Saturday, September 26, 2009
new iMac just around the corner
according to several sites and rumors, apple is going to renew the look and spec of the old known iMac, this supposedly should happen in mid of october this year (15/10/2009), the last rumor is comming from AppleInsider:
Monday, April 14, 2008
Make XP look like Mac
Have you ever wanted to make your XP (or Vista) look like a mac?
this post will explain how to dress XP up so it will look and partially behave (not really) like a mac.
the reason i wanted to do that is: i wanted to enjoy the beauty of mac on my XP at work, unfortunately i couldn't convinced my boss that Mac is the correct platform for development :-)
Change the Boot Screen
so first things first, lets change the first screen we see when we launch the XP/vista the boot screen. in order to do that we need to download the application that replace it, and the Apple boot screen:
Granted its not a mac with the round circle but its better then XP boot screen.
Change Logon Screen
next thing you would like to change is the Logon Screen, this also done using Stardock utility, note that this is a Tiger logon screen, but i guess you can create easily a leopard logon screen, you can download it here:
Here is how it looks on my XP:
Change Explorer to Finder (overall look and feel)
next part i wanted Explorer to look like Finder, and start menu bar like leopard menu bar, there are several ways to achieve that, the most popular is Windows Blinds again a Stardock product, but fortunately there is also a free option called FlyAKiteOSX (this one is actually taking care of everything logon screen, logoff screen, explorer, start menu etc. but as Tiger)
- FlyAKiteOSX home page (you got to see this site)
- Stardock WindowsBlinds (change the visual style of Windows XP)
- A Full Leopard Visual Style for WindowsBlinds
- Mac OSX Tiger Skin for WindowsBlinds
- and another skin of Tiger for WindowsBlinds (better one IMHO)
Here is the WindowsBlinds Configuration Window: (at the bottom you see the available visual style and a preview in the middle)
After you download the skin, you can import it using the "Add Visual Styles" button on the left, and after choosing the style press "Apply my changed" button on the left.
Install Apple Applications
next you would like to do (even if you will not change anything) you got to download the apple Safari browser and iTunes music player, beside making it more apple like OS these are very good (free) products that apple released for the Windows environments, they are not as good as on the mac (far from it) but still windows boring UI get some Mac injection of beauty. also if you would like to have a program like iPhoto then you should download Google's Picasa (if you haven't already)
Change Icons and Wallpaper
the obvious part is the leopard or tiger wallpaper that will complement the windows rigged OS, and a set of icons to replace "My Computer", folder, Control Panel etc. icons. if you are using FlyAKiteOSX that will make a complete makeover to your windows and you will not need any thing else (for a tiger look and feel), but if you have decided to try to achieve the full leopard look and feel then you will need Stardock IconPackager that will allow you to change every icon on windows.
- Stardock IconPackager
- Leopard Wallpapers
- Leopard Icons pack (press the Download link from the upper menu)
- Another Leopard Icon Pack (better one)
Install Leopard 3d Dock
Last but certainly not least, the Dock, what Leopard Mock up can be complete without a shiny sexy 3D dock. also here there is an option from Stardock named ObjectDock, but i think that the free RKLauncher is by far more beautiful and if you get the iVista version (yea, yea get that one) of RKLauncher you get the Grid and Fan Stacks like.
- Stardock ObjectDock (nice, have a free version and a leopard 3D look as well but no stacks)
- RKLauncher (O' Natural)
- RKLauncher iVista version (get this one! in order to download press the image, and there is a video displaying the Dock behavior)
Fan (note the Drawers icons):
Grid stack (the stack background is transparent just like in leopard):
Add Expose and Spaces
lastly we need to add some behavior and to invest a little in the feel and not just in the look,
there are two more additions i used: one is the Expose like for windows and the other is the Spaces like for windows.
now this one was a little hard to choose since there are a lot of them, but i will not include all of them, but here are some i tried:
Expose:
- http://www.oxygen-inc.com/premium/InsaniSoft/iEx.htm
- http://onlinetoolsteam.com/WindowsExposer/Download.asp
- http://www.otakusoftware.com/topdesk/index.html (the one i chose)
- http://www.reflexvision.net/
- http://www.anthasoft.com/anthabounce-windows-tools.php
- http://www.codeplex.com/vdm/Release/ProjectReleases.aspx?ReleaseId=6819
- http://virtuawin.sourceforge.net/
- http://www.free-soft.ro/desktop/desktop.html
- http://www.dexpot.de/ (the one i chose)
- http://update.docs.kr/entry/Download-Summary-en (3D Cube)
- http://www.otakusoftware.com/deskspace/index.html (3D Cube)
download and install one of the many dashboard like applications, there is the Google Desktop that displays the gadgates on a SideBar and you can drag the gadgates out of the sidebar to anywhere on the screen (and auto hide the SideBar). but it will not allow you to hide them all and display all on demand using a hotkey, only from the tray icon or sidebar
this is where the Yahoo! Widgets come in to the game, it displays the widgets in a SideBar (optioanl) that shrinks down when idle, and can be removed or auto hide, the widgets also display on the desktop and can be right cliced->hide and revealed when moving to "Heads Up" mode, you can right click the side bar or tray icon and select "Heads Up" or you can use the HotKey associated with This mode. this mode show all the hidden widgets at once and darken the screen just like in OSX (no kinky animation but stil...), just dont forget to choose "" from options so the blue background will disappear and replaced with the darker glass. (see the screenshots and movie at the end of this post). another cool faeture is that it can put widgets in 3 modes:
1. normal like any other window
2. always on top (always show the window in the foreground on top of other windows)
3. always in the back (as if it lives on the desktop)
Dashboard:
- Yahoo! Widgets (First press "get started" and then you can run it in "Heads Up" mode
- Google Desktop + Gadgaets download page
- DesktopX (another good dashboard like application)
another application i suggest to use is "TransBar" which allows you to make the XP bar transparent, this way you can edit your wallpaper to display the OSX bar and when clicking on the apple - the start menu appear (tacky i know)
and here are some screenshots of the end results:
Enjoy.
Wednesday, April 2, 2008
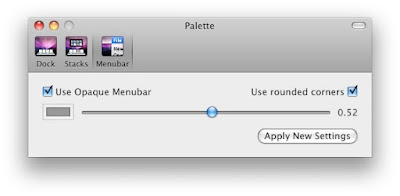
Interface changes (Mac Themes)
is there a possibility to tweak Mac theme? (why would you like to?)
- goto folder "/System/Library/CoreServices"
- right click file: "Finder.app"
- select "Show Package Contents"
- from the new finder window go in to folder "Contents"
- enter folder "Resources"


- open Finder Window
- right click an empty area
- choose "Show View Options"
- from the lower part (Background) choose Color (or image)
- click on the white color box and choose color
- press "Use as Defaults"
- close the popup
Thursday, February 7, 2008
How to move iTunes folder to another location
i wanted to move my iTunes folder (a.k.a library/directory) to another partition (can be hard driver including external whatever),
iTunes for Mac: Moving your iTunes Music folder
- Last Modified on: November 26, 2007
- Article: 301748
Learn how to move your iTunes Music folder to a different location on your Mac. To move the iTunes Music folder on a Windows PC, see this article.
If your hard drive is nearly full after loading all your music into iTunes, or if you just want to move all those music files to another hard drive on your system, here's a way to make the move while retaining all your playlists, ratings, and play history.
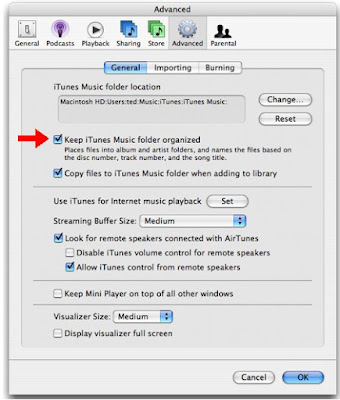
First make sure that the "Keep iTunes Music folder organized" option is checked in iTunes Preferences:
- From the File menu, choose Preferences.
- In the resulting dialog, click the Advanced tab and then click the General tab.
- Select the "Keep iTunes Music folder organized" checkbox.
- Click OK.

Once you've done that, follow the next set of steps to change your iTunes Music library location to the new drive and then consolidate your library to the new location. This not only copies your audio files over, it also retains your ratings and playlists. Note: If you move your music library to an external hard drive, you will need to have that drive connected to access your files. No matter what, it's always a good idea to have a backup of the media you have in iTunes.
- Open iTunes.
- From the File menu, choose Preferences.
- Click the Advanced button in the Preferences window and then click the General tab.
- Click the Change button in the iTunes Music folder location pane.
- In the Change Music Folder Location window that appears, navigate to the location where you would like your new Music folder to be created. Note: By default, your iTunes Music folder is a folder named "iTunes Music" in ~/Music/iTunes/ where the tilde "~" represents your home directory.
- Click the New Folder button in the Change Music Folder Location window.
- In the New Folder window that appears, enter the name of the new iTunes Music folder.
- Click Create.
- Click Choose in the Change Music Folder Location window.
- Click OK in the Advanced window.
- From the Advanced menu, choose Consolidate Library. A message appears that says: "Consolidating your library will copy all of your music into the iTunes Music folder. This cannot be undone."
- Click Consolidate. Important: This action copies all of your music files to the new location. There must be enough hard disk space available to copy all of your music files.
- After the folder has been copied, locate your original iTunes Music folder, and drag it to the Trash or Recycle Bin. Note: Don't remove the iTunes library files that may be in the same location as the iTunes Music folder. For more information about the iTunes library files, see this article.
- Empty the Trash or Recycle Bin.
Note: If you move your library to an external drive, you'll need to power up and connect the drive before starting iTunes. If you don't, iTunes will prompt you to either locate the library or to create a new library (which will result in an empty library).
How Do I Move My iTunes Library from PC to Mac and Keep My Settings Intact
By: Craig Alan Williamson
Published: Tuesday, November 27, 2007
Categories: HOW DO I...?
I recently switched to an Apple Mac and struggled to figure out how to transfer across my iTunes library. Copying the music is simple enough, but I wanted to keep my library file intact with all the play counts, ratings etc. that I had built up over the years. I found plenty of confusing guides that talked about editing xml files and changing access permissions, but I eventually discovered that it is much simpler than anybody seems to realize! So here is my simple 4-step guide to transferring your iTunes library from PC to Mac:
- PC – Consolidate your music library – In your Windows version of iTunes, go to the ‘Edit’ – ‘Preferences’ menu, select the ‘Advanced’ tab and then the ‘General’ tab. Make sure that both ‘Keep iTunes Music folder organised’ and ‘Copy files to iTunes Music folder when adding to library’ have ticks in their little boxes, and make a note of the ‘iTunes Music folder location’. Click on ‘OK’ to save those changes and get rid of the preferences window, and then go to the ‘Advanced’ menu and select ‘Consolidate Library’. What all of this does is ensure that every single music file is held in the same directory, making it very easy to copy all of your music across.
- Mac – Initiate your new iTunes folder – Open up iTunes on your Mac. From the iTunes menu select ‘Preferences’, then the ‘Advanced’ icon and then the ‘General’ pane. Again make sure that both ‘Keep iTunes Music folder organised’ and ‘Copy files to iTunes Music folder when adding to library’ are ticked, and make a note of the ‘iTunes Music folder location’. You can now quit iTunes.
- PC-Mac – Copy across your music folder – On your PC you need to go to the ‘iTunes Music’ folder that you noted down earlier and copy everything across to your Mac’s ‘iTunes Music’ folder. Either move it all to an external hard drive first, or perhaps share the folders across a network and copy across directly. This step puts your music in the right place on your Mac.
- PC-Mac – Copy across your library file – Now find the ‘iTunes Library.itl’ file on your Windows PC (it should be in the ‘My Documents – My Music – iTunes’ folder). Copy this across to your Mac’s ‘iTunes’ folder (note: this is not the ‘iTunes Music’ folder but is usually one folder back from that – you have the correct folder if it has the ‘iTunes Library’ and ‘iTunes Music Library.xml’ files in it). Now, delete the ‘iTunes Library’ file on your Mac, and then rename your newly copied across ‘iTunes Library.itl’ file to ‘iTunes Library’ (i.e. remove the .itl from the end). This has given your Mac’s iTunes a new library file pre-populated with all the extras you wanted to keep from your old library.
And that’s all there is to it! When you next open up iTunes on your Mac, all of your music should be visible and your playlists, play counts, ratings and album artwork should be just as you left them. If something is not quite right then don’t panic – you haven’t deleted anything on your PC so you can go through the steps again and give it another go. This method was tested using iTunes 7.4 on Windows XP and Mac OS X 10.5 Leopard.