Showing posts with label tiger. Show all posts

Wednesday, May 14, 2008

Collected Leopard and Tiger Images


this is a collection of screenshots i have collected from the internet, some i took of my own desktops/laptops, check it out, there are Tiger, Leopard, and my blog images.


check this link.

Have Fun.

Thursday, March 20, 2008

Download Hackintosh OS X Leopard


this is actually not a post with links to downloads, rather then the known types of image DVD available out there for download. (you can search google and add the words rapidshare or megaupload or torrent)

  • iATKOS_v1.0i.iso (10.5.1) (Uphuck official site)
  • iATKOS_v1.0iR2.zip (PPF (patch) so the 10.5.1 ISO will convert to 10.5.2) (Uphuck forum)
  • iATKOS_v2.0i  this is an 10.5.2 release here is the readme link
  • Leo4allv3final (wiki site)
  • KALYWAY_LEO_10.5.1intel_SSE2_SSE3.zip (Kalyway 10.5.1 for Intel and AMD)
  • kalyway_Leopard_DVD_intelSSE3_9a527 (Kalyway 10.5.1 9a527)
  • kalyway_hack_10.5.2ComboUpdate (updates kalyway 10.5.1 to 10.5.2)
  • Kalyway_10.5.2_DVD_Intel_Amd.iso (new - published on 10.04.08)
  • JaS OsX86 10.5.2 Intel SSE2 SSE3.iso (JAS Beta comeback)
  • Leopard-10.5.2-AMD-EFI.iso (Zephyroth Leopard 10.5.2 for AMD)
  • ToH_x86_9A581_RC2.iso ( Mac OS X 10.5.1 Leopard ToH -RC2 SSE3 SSE2 Intel)
  • BrazilMac-9a581-Patch.zip (old BrazilMac-9a581-Patch patch real leopard DVD)
there are more old versions 10.4.x Tiger etc. you can check them in the same manner.

my suggestion or actually my recommendation is to choose the latest Leo4Allv3final, it is the best distribution i have seen yet, it has a multi boot options, a great boot-loader that manage with many computer hardware, many kernels, easy installer, no need to do fdisk in order to set installed partition as bootable, no need to install EFI, and there are useful applications installed, it support SSE2, SSE3, AMD and intel, it has tons of drivers and third party almost entire scene open source on the DVD, i loved it and i warmly recommend it.

next install i would recommend to use is iatkos_v2.0i it has an easy install process, and stable release, it includes many drivers and third party, it has a beautiful site that advertise new releases, iatkos group always was a fast supporting group (they where the first to come out with EFI support, 10.5.1, 10.5.2, etc.), they also have a great community and support forum.

lastly is the kalyway_10.5.2, it is a good and now stable release.

Enjoy.

Friday, March 14, 2008

Prepare the disk partitions

This post is a continue to the "Gather Hardware Data" post.
in this post we will prepare the disk space needed for the leopard and/or tiger install, although you can do this (partially) from the install screens at the Disk Utility menu, still there are several things that can't be done from there, for instance resize partitions, delete partitions, etc.

after you see the number of hard drives you have and the number of partitions, its time to decide in what partition should the tiger and leopard installations shell reside in, (if you wonder why do you need tiger then the answer is if you have an upgrade version of leopard then you need it see more at this post.) both leopard and tiger needs separated partitions, the minimum size required is 5G - 5.5G i would use 6G for tiger and as much as needed (above 5G) for the leopard, the tiger can be wiped and used for other needs after we finish with it.

so from XP right click "My Computer" and choose "manage"


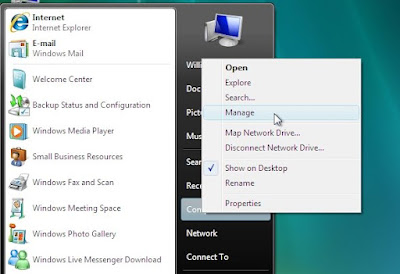
from vista open "Start Menu" and right click "Computer" and choose "Manage"


next the management console appear (from here looks the same on XP and vista), on the left tree select "Storage" and "Disk Management"


on vista it looks like this:


now you can do operations like select the appropriate partition and delete it and create an empty one so there will be a free space for the installation (note if you delete the partition data on that partition is lost forever there is no undo)


in vista there is another option, you can shrink the partition on the account of the free space available, so for instance if you have a 50G partition with data on it, but 30G is free space, you can shrink the partition to still exist in vista and keep the data intact but take for instance 25G from the free space in order to create another partition, in that case the windows partition win bbe 20G occupied data 5G free space and the new partition 25G unformatted. (there is no need to format it since we will not use windows format (like NTFS, FAT, FAT32) but mac format (HFS+)). in order to shrink a partition do this:
right click on the selected partition from the graphical representation and choose "Shrink Volume":


then you see a dialog asking you to specify the data to convert from free space to unformatted partition


in the end you will get something looking like this:


the problem with this solution is that like every Microsoft solution it looks as if the developers did not take the time to learn, design, or test the feature, sometimes there are blocking files that reside at the middle or end of the partition, they are not movable, and they prevent from shrinking the whole partition free space, the way to workaround this is to use external Defrag tool (Microsoft built in defrag does not do the job), tools like: "Paragon partition manager", "DiskKeeper" (i used it its fast reliable and delivers),


before activating these tools do this:
  1. disable System Restore and shadow copy
  2. disable on the designated drive the virtual memory system cache
  3. then you can defrag MFT
  4. and defrag the files
in order to disable the virtual memory (A.K.A Paging file) do this:
open "Start Menu" right click "Computer" and select "Properties",


a "System properties" window appear,


on the left sidebar at the bottom there is a "System Performance" link, press it, and a "Performance Options" dialog appears,


in "Virtual Memory" click the "Change" button at the bottom, "Virtual Memory" dialog appears,


in the upper HD table select the HD you wish to shrink and choose for it the "No paging file" radio button, then press set and ok, reboot the computer.

in order to turn off "System Restore" do this:
from the "System Property" windows choose the "System Protection" link,
it will display the "System Properties" dialog, choose the "System Protection" tab,


then click on the "System Restore" button, uncheck the HD you wish to shrink, it will ask you to verify, then press "Turn System Restore Off".


press OK and close all dialogs and reboot the machine.

thats it, next you need to start the install procedure for that please goto the "BIOS Options for hackintosh" post.

Enjoy.

Gather Hardware Data

this is a continue post to the first post of "how to install hackintosh"


in this post i explain all there is to know about gathering the hardware information from the windows already installed on the PC, if this is not the case, you can skip this post or install windows and gather the info, it sounds crazy i know, but worth it, it will allow you to setup the correct drivers and avoid incompatibility issues.

the gathering data starts with checking that your computer is "hackintosh ready",
this is done by executing the CPU-z app that you downloaded in the previous section,
there you will see several tabs each elaborating on the hardware you own.
tabs include: CPU, Cache, Mainboard, Memory, SPD, About.


the most important tab we will use is the CPU, what you need to check is that your CPU support the feature SSE3,


although today you can download "iatkos v1.0iR2" leopard 10.5.2 image that supports SSE2 for older PCs or AMD based PC, non the less i urge you to gather all the info you can and save it, you never know what application/driver/hardware you will install/custom/buy in the future that will require this info, and if you are like me, removed your windows partition (since loosing 40-50G just for the need of 3-7 apps is not justifiable) then you will need this info stashed.


after saving all the tabs in the CPU-z (probably as jpg on a remote computer or disk on key), next we will head on to the Device Manager.
on XP right-click the "My Computer" icon on the desktop and choose "Properties"


on vista open the start menu and right-click "Computer"


on XP after that you see the "System Properties" dialog, choose the "Hardware" tab and click the "Device Manager"


on vista you see this next screen (the new System Properties), and on the left side bar you click on "Device Manager"


from this point both XP and Vista look the same (beside look and feel) so next we go through major hardware components that usually needs drivers, for instance Display Adapter, Network Card, Sound blaster, if you have some special mouse or keyboard, Bluetooth, Power Management, etc. and then we right click these icons and save the info as much as we can.


what we need to save is: irq, memory range, the exact name and model of the component, in several i would suggest saving the device id and vendor id, these parameters can be found at the "details" tab under the first drop-down item "Device Instance ID",


the line that appear includes the Vendor ID next to the VEN_ string in this example it is: "10DE", also next to it you find the Device ID next to the string DEV_ in this case it is: "00C0".

next we will collect the EDID information of the "Display Adapter", you do that using the previously downloaded "softMCCS" app.
  1. run the application and you will see this next screen
  2. open the EDID Identification section
  3. go to "Raw Data" and copy the content, save it as text
next step is to clear HD space or decide on what disk/partition the Hackintosh will reside on.
in order to do that we need to take two steps: 
  1. learn/save your hard drive/partition data 
  2. take action such as delete partition or shrink a partition.
first step:
open command box (A.K.A DOS Box) from run write CMD


next write (XP or VISTA) DiskPart, it will enter the windows "Disk Partition management" CLI (Command Line Interface).


if you write ? and press enter you get a help screen that display the available commands and a short explanation next to them.


now use the command "list" in order to see all the available hard disk, partitions, and if needed volumes
in order to see all the hard drive installed on your system use: "list disk"


after displaying all the HD you need to choose the hard disk you want to work on / see further details on. you do that using the command: "select disk X" where X stands for the hard drive number.


after selecting the drive you can see all the partition on the selected disk write: "list part"


now that you know your hard drives and installed partitions (especially size and their number) write it down, you will need it in the install stage.

you can select the partition (in case you need it) using "select part X" where X stands for the desired partition number.


and you can display the list of volumes on your PC (volume can be a single hard drive, CD, DVD, several Hard Drives combined together into a single volume etc.) using the command: "list vol"


Note: the bootable Hard Disk is marked with an astrik (*) sign next to it.
you may change it using the "Active" command but we will do it after the install stage so there is no need to do it here.

you can also ask for details at any stage on a specific object (disk,part,vol) using the Details command.


in order to exit the DiskPart utility simply write "Exit"


next we need to prepare the disk space needed for the leopard and/or tiger install goto the post: "Prepare the disk partitions"

Enjoy.

Saturday, February 9, 2008

Leopard Dock tweak 2D-3D (tweak series)

This tweak turns your dock into a 2D dock like tiger had (go knows why would you like to do that):
1. go into terminal and write:
   defaults write com.apple.Dock no-glass -bool yes;
   killall Dock

the dock will disappear, wait for 5 sec and the dock will reappear, there you go you have a 2D dock,

1. in order to go back to a 3D you need to use these commands:
   defaults write com.apple.Dock no-glass -bool no;
   killall Dock


Friday, February 1, 2008

Should i install Tiger or Leopard or both

my first question was should i install Tiger (10.4) or Leopard (OS X 10.5) or both.
at first i installed tiger, then i installed leopard as an upgrade to the tiger in a different partition,


Side Note: i tried tiger for a while to get the feel of the OS learned what is so good in mac, that was a quite a reprogram of my habits and knowledge regarding how OS should be, Microsoft has ruin us all but i was willing to learn and try, once you get the hang of it you understand how good the OS is, and, little by little i found that all new features that i was exited about on MSOS was just a rip-off a copy from OS X and not only that, but a bad copy, a heavy copy and slow copy! so today i enjoy both worlds since i have parallels and dual boot, but you should know that i use MS only for gaming purposes although most of my games i use in OS X many more accessible only to MS, i am an average joe but i develop, do office stuff, surf the web, blog,see video, listen to music, gaming, torrents... etc. but i have yet to find why i need MS OS (beside gaming) but again on mac i can get both worlds.
a cute youtube movie on that:


then i upgraded to leopard, that was an amazing leap from windows especially from vista, after leopard i had no need for tiger, i upgraded the tiger partition into leopard as well, so at this point i had two separated installation of leopard, i use the tigerToLeopard partition as a test partition and every install that can crash (Panic) my system i test there, kind of a sand box. after perfecting the install i deleted the partition and joined it with the primary leopard installation but that how-to will be covered in another post.


also note that since leopard (that i used, i assume all other hackintosh are also upgrades) is upgrade to an existing mac, so it is mandatory to install mac os x before leopard, if you try to install it without previous system it will display the welcome video in a loop 3 times and crash

i tried in the "Do you already own a Mac" screen to choose "do not transfer my information now" but it looped through the welcome screen, so the conclusion (4 me) that Tiger is mandatory, but if you find a better method please comment here.


Note: i think tiger is a very good OS it has all the basics of leopard that i love and enjoy, it is more stable and less hardware demanding, but leopard has made the final leap and got me converted, it has spaces and time machine that realy leaves no question as to if i will indure windows for another year or two,

How to Install a Hackintosh (Tiger and Leopard) on a PC

Your starting point should be like all of you out there you have a PC with some sort of Microsoft Windows OS installed, these are the steps you need to take in order to install hackintosh on your PC: (if you don't know what hackintosh is please read this post)


the end result of this procedure will be a PC with multi-boot windows and tiger and leopard OS, you may want to completely remove windows partition or delete the Tiger install.

  1. plan ahead
  2. download necessary Applications and utilities
  3. gather hardware data
  4. prepare the disk partitions
  5. BIOS options for hackintosh
  6. Install Tiger (mandatory for several install types especially iAtkos)
  7. Install Leopard (iATKOS_v1.0i, Leo4Allv3)
  8. Finalize your installment (and perhaps extra driver install)


1. Plan Ahead

Hardware and Drivers

maybe the first thing you would like to do is to read on leopard hardware compatibility list and make sure you own the appropriate hardware so that the installation process will end up with a bootable and fully functional computer system.

Apple OS (until 2 years ago) could be installed only on MAc computers, since May 2006 Apple migrated its OS to support intel based computers (A.K.A PC) so no Apple hardware is required to install their latest OS Tiger and Leopard as far as i know there are no earlier versions for PC (such as panther and jaguar).

these computer were named with 'i' prefix to indicate they are intel based (iMac for desktops but MacBook/MacBook Pro for laptops since in 1999 the G3 laptop was named iMac so that was already taken).

now that apple support also intel they shipped with the OS a limited list of drivers for intel based hardware (motherboards, cpu, memory, video cards, HD, wifi, bluetooth etc.)

since apple sell their computers with the OS and it is NOT possible to buy the OS and install it on a simple PC (apposed to Microsoft) they need to ship only drivers for hardware they use, sell, and support.

so a driver is a big issue, drivers that were not coded by apple and is not available by the manufacturer or by the open community cannot be supported by Hackintosh!

that is why you need to think reverse if there is no driver available for your hardware buy one that is supported.

to see what hardware is supported and at what level of support (some features/all features/protocol versions/standards etc.) you may go to:


scroll down to the hardware section there is a list of links for each version of OS X.

Note that: Tiger is OS 10.4.x and Leopard is OS 10.5.x
the x stands for minor release version number and depends on the install ISO that you will download but usually if it is supported on 10.5.x it should be supported on any x there is and the same goes for tiger 10.4.x.
another good place to look for is InsanelyMac site that helped me in my move to hackintosh,
you can find success stories and driver in Drivers forum or HCL 10.5.1

Decisions
next there are several decisions you have to take before you start the installation process,

1. if you would like to install Tiger (10.4) or Leopard (OS X 10.5) or both.
my suggestion: Read here

2. if you would like to dual boot with windows or install only Mac OS X on the target computer.
my suggestion: most of you (like me) will already have a windows installed and you will want to keep it (at least for a while until you will be sure it is a move you want to make), also mac has an obvious downside (games) if you settle for simple arcade games or 4-10 games of a greater scale then you are set, but if you are a serious gamer then mac cant handle your needs (yet), so keep your windows partition and enjoy both worlds. that said please note that i couldn't wait for the moment my hackintosh to be complete (almost) so i can kick my windows partition goodbye, when that day came i gladly formated it and shared the space with my hackintosh system.

3. if the installation goes into (an existing disk) into a partition, or to a separated (dedicated to OS X) disk
my suggestion: i used a secondary partition that i didn't have, i used a defrag and partition shrink on a vista disk to make room for the new bright shinny mac. if you have a disk to spare use it, its a better solution, you can format it detach it, identify it better at every stage, you can disconnect the other disk for the install process so you wouldn't make any mistake and if you have a bios that supports boot select then you don't need to be bothered with multi boot issues (if you choose seperated disk and multi boot from bios).

4. what kind of installation disk are you going to use. there are several version of hackintosh for leopard and several for tiger, for instance "kalyway", "iAtkos", "Brazil", "MacDotNub" ...
my suggestion: personally i use iAktos since it is significantly smaller to download and still includes 99% of the original 6.5G installation (that requires dual layer and makes things complicated), also iAktos have a tiger and a leopard version so they match each other without compatibility issues when upgrading from tiger to leopard. also these guys release fast, for instance they were the first to come out with 10.5.2 ppf patch to upgrade their ISO from 10.5.1, that said i read allot on this issue and i found people loving Kalyway. so if i didn't had the iAtkos option, i would use kalyway, that would be my second choice.


2. download necessary Applications and utilities
i cant really give links here but i am willing to give a check list of all needed material.

1. defrag + partition magic (for the windows partition in order to shrink it if you intend to use none existing partition rather then a seperated disk)
2. GNU Gparted or parted cd image. (this is free linux based utility that you need to burn on a cd and boot from in order to create partitions, destroy, move, resize, format, or flag as bootable)
3. uphack iAtkos Tiger 10.4 installation image (or any other hackintosh installation flavor)
4. uphack iAtkos Leopard 10.5 installation image (or any other hackintosh installation flavor)
5. CPUz (a windows utility that evaluates the CPU capabilities and lets you know if you have a SSE3 or not, if your CPU supports it then it is possible to install leopard on your PC)
6. softMCCS.exe (another windows application that will help you extract data of your video card in order to inject the video card kext(Kernel Extension) with it)
7. Property list editor dmg (for editing xml info files (definition part of a kext))

well thats about it.

the rest of the post continue at the post: "Gather Hardware Data".

Saturday, January 26, 2008

Apple 2 PC General Info

hi,


I love apple and mac but don't have/want to spend money on it, i am too invested in wintel (windows and Intel combination) and didn't know how wonderful mac is, until one day i payed more attention, read, seen you tube movies of the leopard system, i got hooked, there is a sentence echo in my head regarding mac "once you try it you cant go back" you have no idea how true it is.

The search began, price compare and tyred to get new mac, the problem is i bought a laptop in 2500$ 7 month earlier so there is no way my wife will allow me another computer not alone mac that comes to 5000$ (i live in Israel and mac prices are ridicules), so i started trying lowering the cost by buying from abroad or settling for less CPU power smaller screen, but still no go.

Alternatives, i started checking can i emulate? vmware? or even install leopard on a PC, luckily all the answers were yes! i started vigorously searching learning and testing, until i got to a point i was satisfied with the results.

Next exit AppleVille, make no mistake my next OS/Platform is apple mac only it will take me some time to get there (next scheduled computer buy/upgrade), i insist not to spend another dollar on generic PC.

Legality, You will find some people claiming that they done the Hackintosh procedure and turn it legit by buying a copy of leopard or tiger but the painful truth is that Hackintosh as its name it is a hacked Macintosh, the apple license give you no permission to change their OS in any way it is not open source (beside several drivers they publish), so save your bucks until you own a real mac, and beside you will need the bucks when you would like to spoil your mac buying it mouse/keyboard/apps/addons etc.

Why Hackintosh? Hackintosh is a way for people with no extra bucs for mac, or would like to try mac and have opinion on it before buying. (note that mac performs way better then Hackintosh and there are problems with hackintosh that would never occur in a mac but as long as you can filter the noise you can get the idea of how wonderfull mac is)

What can be done with Hackintosh? practiclly everything that an intel based mac can do, you will get a fully featured OSX, install games and apps for mac, apple calls it Universal and even have a logo for it (look image below), surf the web, download, use web cam, cammeras, scanners, listen to music, create DVDs, edit movies, create music, build web sites, develope, whatever you can do with a simple PC with windows mac can do it (IMHO it can do it better).
Universal Logo

Abandone windows? this is a deal breaker! for those of you that cant abandon their winbox, and feel scared and homeless without it apple thought of you guys as well, the best part that won me over is the ability not only to multiboot with windows (directlly from darwin or by using bootcamp or boot manager), but to run windows apps from withing the mac OS as if they were mac applications, you can decide to run the whole windows system in a single window or full screen, or! run each application in its own window with its own icon, able to minimise, maximise, in a mac way, the windows can live next on beneeth mac window and copy paste drag and drop etc, all this can be achieved using VMWare or Parallels software that you can install after the OS is up and running.

well thats it for now, next posts will include download, install, troubleshooting and stuff i encounter with my hackintosh, neet downloads, link to other sites... stay tuned.

 
the menu is from: Milonic DHTML menus