Showing posts with label microsoft. Show all posts

Tuesday, May 13, 2008

How to Connect to Windows Share


this is a quick How-To connect to a share on a remote windows computer,

there are several ways to do everything, i hope some of you will post some comments and share your tips as well.

actually this trick works not just for windows computers, you can use this method in order to connect to any smb share (Mac, Linux, Solaris, Unix, Novel, Windows).

first we have to enable the smb protocol on the destination PC. click on the link in order to read how it is done on a Windows PC.

in order to connect to a remote computer (windows) do this:
1. from "Finder" Go menu select: "Connect to Server"

2. a "Connect to Server" dialog appears

3. at the "Server Address" write: smb://SERVER_NAME/SHARE where SERVER_NAME should be replaced with the server name you want to connect to, and SHARE should be replaced with  the share name you want to access.

4. press "Connect" and a connect progress dialog appears

5. if you did not specify a SHARE, then a share list appear waiting for you to select a share.

6. select  a share and press "OK".

7. an icon of that share will appear on your desktop.

from this point on you treat this disk like any other DMG/Cd/DVD/USB Disk, if you have enough permissions you can write, delete, change, etc. to disconnect simply drag it to the trash.

Enjoy.

Wednesday, May 7, 2008

How to Access OSX drives from Windows


If you have a disk or partition of windows that you boot from and you need to access your files (images, music, movies, etc.) on the Leopard or any other OSX drive then read on.

for this purpose you need to use MacDrive application, this application is installed on windows and can display Macintosh Hard Drives inside "My Computer" as if they are normal windows partitions, you can read, write, change and even delete files if you must.

the installation is very simple (next,next,next), and after it is done you reboot and you can access your OSX drives from the hackintosh dual boot, or from USB external Time-Machine.

1. download MacDrive
2. from windows install MacDrive
3. reboot into windows (make sure Mac drives are connected)

thats it, the MacDrives will be marked with a special icon indicating they are Mac and not simple windows HD.
after the install "My Computer" should looks like this:


Enjoy.

How to Access NTFS (R/W access) from OSX


this post is written due to a readers question (i added the email and the response as a comment to this post),
he was having problems writing to NTFS (Windows Hard Drives), if you have dual boot or connecting USB Hard Drives that have NTFS File System and want to access it from within OSX for writing purposes then read on.

if the HD is plugged or mounted after the system has loaded (for instance a USB disk on key) then you get a read/write access and can do whatever you wish to that USB Flash Drive.

but if you have a Disk connected and already have an NTFS file system on it then it will be auto mounted at boot time but it will give you read only access. for instance i have a vista partition dual booting with OSX and from within OSX it looks like this:


so what you need to do is to install two simple utilities:
MacFUSE (Mac File-System User-Space) it support the file system of many kind in a kernel-level so they integrate from the OSX almost natively.
NTFS-3G a driver that support the linux FUSE spec and can be run on-top of the MacFUSE Plugin and support the NTFS from within Mac OSX.

the steps are very easy:
1. download MacFUSE
2. run MacFUSE Core.pkg
3. download NTFS-3g (make sure to download the "Mac OS X DMG Package")
4. mount the DMG file
5. run NTFS-3G.pkg
6. restart

thats it, the final result should look like any other drive like this:


if you would like to uninstall NTFS-3G follow these steps:

  1. from the NTFS-3g DMG execute the script: "Uninstall NTFS-3G.command"
  2. press "Open" on the appearing popup
  3. in the terminal that appear enter your password and press enter
  4. wait until this message appears: [Process completed] and then you can close the terminal
if you would like to uninstall MacFUSE follow these steps:
  1. open a new terminal and write: sudo -s (and press enter)
  2. enter your password and press enter
  3. paste these two lines and press enter after each one of them
  4. lsbom -fls /Library/Receipts/MacFUSE\ Core.pkg/Contents/Archive.bom | colrm 1 1 | xargs rm -v
  5. rm -rv /Library/Receipts/MacFUSE\ Core.pkg
  6. reboot
your computer will come up without NTFS-3G and without MacFUSE.

here are the Install screenshots in case you need them:

MacFuse Install Screen Shots:


and the NTFS-3G Install Screenshots:


Enjoy.

Friday, April 25, 2008

Apple Mac vs Microsoft Windows History

I have read some articles on windows and mac history just to try and figure out if it was allways that good on the mac side and i was just MS windows adict without the ability to try other stuff, well guess what...

here is a very good and representative image that display the history quickly (thanks to lirent.net):


and here is an in depth article with screenshots (thanks to WillyHoops blog).
this is yet another good screenshot comparison of Mac OSX vs MS Windows.

Enjoy (your history).

Saturday, March 29, 2008

Leopard security breached due to Safari vulnerability at CanSecWest


a new security breach has been discovered in OS X Safari, a hacker named Charlie Miller has hacked into a macbook air in under 2 minutes and read a file in the contest PWN2OWN in the security conference CanSecWest that is held in Canada (partially sponsored by Microsoft and Google).


the happy hacker beside getting the recognition he deserve, he also get to keep the computers he successfully hacked (in addition to the 10,000$ reward), he was the one that hacked into the iPhone first at last years security summit, and he also talked about it in the CanSecWest.

what is the exact security
you can read all about it anywhere, here is a NYTimes Link, and here is another link,

i think that if he succeeded under 2 minutes then he came prepared from home, and it got me thinking, who the hell will spend a great hack like that on a vista or linux that runs on PC its worth more to hack a mac especially a macbook air.

the security threat or hack method is not publicized yet, the security expert miller was signed by TippingPoint for his discovery and did not publish the hack method.

i was very disappointed to hear that old crappy vista wasn't the first to fall, and leopard that does everything right got busted probably due to rapid development and extreme speed of releases on safari behalf, we have seen many versions of safari in the past month alone,
its good for us as consumers but bad for bugs, security threats, and apples reputation.

of course that the Microsoft lovers laughing their @ss off but its like a leper laughing at a guy with a zit so that reminded me this youTube video (very funny).

Vista however got hacked at the last day of the contest by Shane Macaulay, with the help of Derek Callaway, the fujitsu laptop and vista got hacked due to a Java security workaround, the box contained Microsoft latest SP1.
the sole remaining undefeted box was Sony Vaio with Linux.


hope this is the last blow apple will take for Microsoft (probably not),

Enjoy (well i at least try to).

Friday, March 14, 2008

Prepare the disk partitions

This post is a continue to the "Gather Hardware Data" post.
in this post we will prepare the disk space needed for the leopard and/or tiger install, although you can do this (partially) from the install screens at the Disk Utility menu, still there are several things that can't be done from there, for instance resize partitions, delete partitions, etc.

after you see the number of hard drives you have and the number of partitions, its time to decide in what partition should the tiger and leopard installations shell reside in, (if you wonder why do you need tiger then the answer is if you have an upgrade version of leopard then you need it see more at this post.) both leopard and tiger needs separated partitions, the minimum size required is 5G - 5.5G i would use 6G for tiger and as much as needed (above 5G) for the leopard, the tiger can be wiped and used for other needs after we finish with it.

so from XP right click "My Computer" and choose "manage"


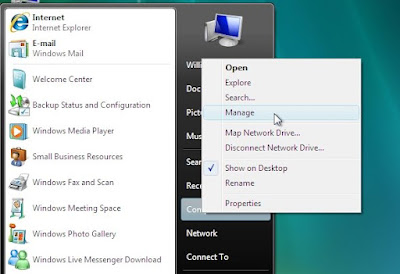
from vista open "Start Menu" and right click "Computer" and choose "Manage"


next the management console appear (from here looks the same on XP and vista), on the left tree select "Storage" and "Disk Management"


on vista it looks like this:


now you can do operations like select the appropriate partition and delete it and create an empty one so there will be a free space for the installation (note if you delete the partition data on that partition is lost forever there is no undo)


in vista there is another option, you can shrink the partition on the account of the free space available, so for instance if you have a 50G partition with data on it, but 30G is free space, you can shrink the partition to still exist in vista and keep the data intact but take for instance 25G from the free space in order to create another partition, in that case the windows partition win bbe 20G occupied data 5G free space and the new partition 25G unformatted. (there is no need to format it since we will not use windows format (like NTFS, FAT, FAT32) but mac format (HFS+)). in order to shrink a partition do this:
right click on the selected partition from the graphical representation and choose "Shrink Volume":


then you see a dialog asking you to specify the data to convert from free space to unformatted partition


in the end you will get something looking like this:


the problem with this solution is that like every Microsoft solution it looks as if the developers did not take the time to learn, design, or test the feature, sometimes there are blocking files that reside at the middle or end of the partition, they are not movable, and they prevent from shrinking the whole partition free space, the way to workaround this is to use external Defrag tool (Microsoft built in defrag does not do the job), tools like: "Paragon partition manager", "DiskKeeper" (i used it its fast reliable and delivers),


before activating these tools do this:
  1. disable System Restore and shadow copy
  2. disable on the designated drive the virtual memory system cache
  3. then you can defrag MFT
  4. and defrag the files
in order to disable the virtual memory (A.K.A Paging file) do this:
open "Start Menu" right click "Computer" and select "Properties",


a "System properties" window appear,


on the left sidebar at the bottom there is a "System Performance" link, press it, and a "Performance Options" dialog appears,


in "Virtual Memory" click the "Change" button at the bottom, "Virtual Memory" dialog appears,


in the upper HD table select the HD you wish to shrink and choose for it the "No paging file" radio button, then press set and ok, reboot the computer.

in order to turn off "System Restore" do this:
from the "System Property" windows choose the "System Protection" link,
it will display the "System Properties" dialog, choose the "System Protection" tab,


then click on the "System Restore" button, uncheck the HD you wish to shrink, it will ask you to verify, then press "Turn System Restore Off".


press OK and close all dialogs and reboot the machine.

thats it, next you need to start the install procedure for that please goto the "BIOS Options for hackintosh" post.

Enjoy.

Gather Hardware Data

this is a continue post to the first post of "how to install hackintosh"


in this post i explain all there is to know about gathering the hardware information from the windows already installed on the PC, if this is not the case, you can skip this post or install windows and gather the info, it sounds crazy i know, but worth it, it will allow you to setup the correct drivers and avoid incompatibility issues.

the gathering data starts with checking that your computer is "hackintosh ready",
this is done by executing the CPU-z app that you downloaded in the previous section,
there you will see several tabs each elaborating on the hardware you own.
tabs include: CPU, Cache, Mainboard, Memory, SPD, About.


the most important tab we will use is the CPU, what you need to check is that your CPU support the feature SSE3,


although today you can download "iatkos v1.0iR2" leopard 10.5.2 image that supports SSE2 for older PCs or AMD based PC, non the less i urge you to gather all the info you can and save it, you never know what application/driver/hardware you will install/custom/buy in the future that will require this info, and if you are like me, removed your windows partition (since loosing 40-50G just for the need of 3-7 apps is not justifiable) then you will need this info stashed.


after saving all the tabs in the CPU-z (probably as jpg on a remote computer or disk on key), next we will head on to the Device Manager.
on XP right-click the "My Computer" icon on the desktop and choose "Properties"


on vista open the start menu and right-click "Computer"


on XP after that you see the "System Properties" dialog, choose the "Hardware" tab and click the "Device Manager"


on vista you see this next screen (the new System Properties), and on the left side bar you click on "Device Manager"


from this point both XP and Vista look the same (beside look and feel) so next we go through major hardware components that usually needs drivers, for instance Display Adapter, Network Card, Sound blaster, if you have some special mouse or keyboard, Bluetooth, Power Management, etc. and then we right click these icons and save the info as much as we can.


what we need to save is: irq, memory range, the exact name and model of the component, in several i would suggest saving the device id and vendor id, these parameters can be found at the "details" tab under the first drop-down item "Device Instance ID",


the line that appear includes the Vendor ID next to the VEN_ string in this example it is: "10DE", also next to it you find the Device ID next to the string DEV_ in this case it is: "00C0".

next we will collect the EDID information of the "Display Adapter", you do that using the previously downloaded "softMCCS" app.
  1. run the application and you will see this next screen
  2. open the EDID Identification section
  3. go to "Raw Data" and copy the content, save it as text
next step is to clear HD space or decide on what disk/partition the Hackintosh will reside on.
in order to do that we need to take two steps: 
  1. learn/save your hard drive/partition data 
  2. take action such as delete partition or shrink a partition.
first step:
open command box (A.K.A DOS Box) from run write CMD


next write (XP or VISTA) DiskPart, it will enter the windows "Disk Partition management" CLI (Command Line Interface).


if you write ? and press enter you get a help screen that display the available commands and a short explanation next to them.


now use the command "list" in order to see all the available hard disk, partitions, and if needed volumes
in order to see all the hard drive installed on your system use: "list disk"


after displaying all the HD you need to choose the hard disk you want to work on / see further details on. you do that using the command: "select disk X" where X stands for the hard drive number.


after selecting the drive you can see all the partition on the selected disk write: "list part"


now that you know your hard drives and installed partitions (especially size and their number) write it down, you will need it in the install stage.

you can select the partition (in case you need it) using "select part X" where X stands for the desired partition number.


and you can display the list of volumes on your PC (volume can be a single hard drive, CD, DVD, several Hard Drives combined together into a single volume etc.) using the command: "list vol"


Note: the bootable Hard Disk is marked with an astrik (*) sign next to it.
you may change it using the "Active" command but we will do it after the install stage so there is no need to do it here.

you can also ask for details at any stage on a specific object (disk,part,vol) using the Details command.


in order to exit the DiskPart utility simply write "Exit"


next we need to prepare the disk space needed for the leopard and/or tiger install goto the post: "Prepare the disk partitions"

Enjoy.

 
the menu is from: Milonic DHTML menus