this is a continue to the "BIOS Options for hackintosh" post
this post will be a screen-shot guide of how to install Leopard on a PC,
if this is the first post you read regarding this issue please read the previous sections they will save you a lot of troubleshooting in the install process,
this guide is based on iAtkos 1.0i 10.5.1 without the 10.5.2 PPF, the installation DVD i used is an upgrade and require a pre installed Mac, i used for that an iAtkos tiger install, in order to see the tiger installation post refer to the "Install Tiger" post, another solution is to download a full installation of leopard (not an upgrade), i know there is a Kaliway and uphack iAtkos versions of it.
these screenshots comes from my LG W1 Laptop, it has this hardware mounted on it:
- Core2Duo 1.83Ghz x2 (only one working when the other is enabled i get a reboot loop)
- 2G DDR2 667
- 120G SATA HD (can support RAID)
- PCMCIA Texas Instruments Card Reader
- Dual-Layer DVD Burner
- USB 2.0 x4 or USB 1.0 x2 + USB 2.0 x2 (both successfully supported)
- ATI X1600 Mobility (working with ATIinject)
- Sound Card (internal speakers not working)
- 17" LCD
yet i have successfully installed this leopard version in more the ten computer types, including laptops and desktops (though i didn't try AMD yet, i have one at home waiting to do just that, it will require a different leopard version one that supports SSE2, i will add a post regarding that), among them Core2Duo, 1G/2G, internal HD/External HD, WIFI, ethernet cards, cable internet, ADSL, LCD, CRT, bluetooth, etc. if you want to know if your PC will be supported check the OSX86 HCL (Hardware Compatibility List)
lets begin, first insert the burned DVD (i used alcohol 120% with generic format to burn the copy)

next turn the computer on, so it will boot from the DVD (make sure the BIOS is set to boot from DVD first)

after booting you see a screen similar to this, counting backwards, and notifying that it is loading the Darwin boot loader, allow it to proceed until you see the next gray apple screen

next you see the apple boot screen this should take between a minute to 5 minutes

in the meanwhile connect a USB keyboard (if you are on a laptop it is a good bet that the internal will not work out of the box), in desktop try not to mix mouse and keyboard ps2 with USB, ether both USB or both PS2 (although it can work mixed).

i use a silicon roll up keyboard so it bothers me less (but it still bother)

next you see the 'About' screen of the install and the 'About' message was removed and what left is just "Click Next" message so go ahead an click next

the 'next' button is in the lower right side of the screen

a progress indication dialog appears should take up to 1 minute or so

next a 'Welcome' screen appears and since this is a tweaked leopard install you see the hacker group message here, mine say iAtkos + version, click Continue

next screen should have been the Apple License agreement but here we get the iAtkos group "readme" file content, use only English language and click Agree

now the fun begins, this screen ether display hard drive partition that you can install leopard on, or not most of you will not see the Hard drive icons, don't worry about it we will soon create one that will be visible, and usable, if you see one and want to use it as your install partition then click it and jump the "Darwin Install" step.

next click on the "Utilities" menu from the upper menubar
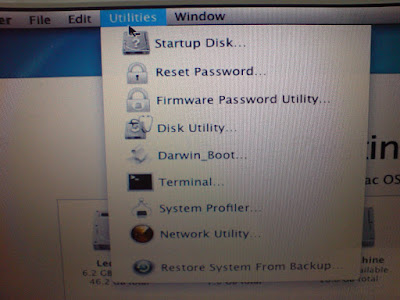
and choose "Disk Utility", the screen will be replaced by the disk utility application

in this screen you see a center section that is empty for the moment and on the left you will see all the disks and partitions available on your PC, on the upper part you see an icon bar that can perfom several operations on the selected disk/partition

select the partition you want to erase (and install leopard on) from the left disk/partition tree, immediately you see the center changes allowing you to see summary info on the selected partition and perform operations like erase, create, format, fix etc.

from the center part of the screen press the Erase tab

choose a volume format, Mac OS Extended (Journaled),
in the name text field write the name of the partition (this is the name of the HD icon on the Mac desktop and the name of the boot partition you will see in the Darwin boot screen, so choose it carefully, i think only English is supported, try not to use spaces in the name and it is Case sensitive), i used Leopard2 in this example, and click the "Erase" button

next you get a popup screen (in mac its rather a scroll down) that asking you to confirm to erase the partition looking like this: (click the erase)

next the partition is erased and a progress bar indication available at the bottom of the screen, after the erase finish you see a complete message and on the left partition/disk tree there is a new icon of the recently formated/erased mac partition (leopard2 in this example), close the "Disk Utility" window and exit to the main install window
 Darwin Install:
after the disk formatting you should be able to see its icon in the main screen, do not select it yet we need to finish one more step, that is the installation of the darwin boot loader it is responsible to initialize all the kext(Kernel extension) and boot the system, also we will install the EFI system that will allow to run a vanilla kernel.
from the Utilities menu in the menu bar select Darwin Boot

next the main screen disappear and a terminal window appears elaborating on the procedure, go ahead and read it,

at the end it ask you: do you want to continue, press y

it asks you to write the number of the Hard Drive you want to install Darwin on (the drive that will be bootable and mac will be installed on it) use the drive that you recently erased (it should be available from the data you gathered in an earlier stage), please note that every hard drive number should be added 1 to it so for instance your first driver (number 0) you should enter here 1 instead, etc.

next comes the partition number write the real number (first is 1, second partition on that disk is 2, etc.) (sorry i dont have a screen shot for that one).
last step is to install the EFI (it works on most PCs, if it won't work on yours, just reinstall and skip the EFI part), EFI allows the hackintosh to operate as a real leopard, including Software Update and several kext (drivers), it uses a vanilla kernel code,
so in the next question: "Do you want to install boot EFI" press Y (sorry no screen shot for this one as well).
lastly you will be asked: "Are you sure? " (for all the previous answers you gave), if you answer yes the darwin and EFI (if you selected Yes on EFI question) will be written to the disk and partition you selected, if you answer no all will be discarded and you can redo this part and reselect your options.
write Y, after the darwin install is finish it will write exit, logout, [Process Completed], the install takes 5-10 seconds

after the install is completed we need to flag this partition as bootable, this will allow you to boot from the newly installed partition,
to open a new terminal window from the Shell Menu, choose new Window->Homebrew
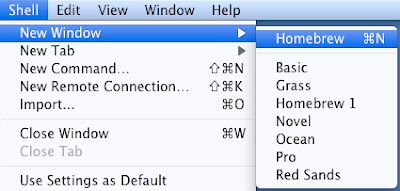
a new terminal window appears, enter the fdisk CLI (Command line interface) using this command:
/usr/sbin/fdisk -e /dev/rdisk0
replace the last number (in this example 0) with the your leopard install HD number
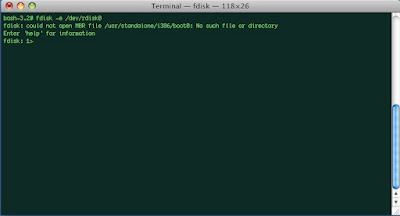
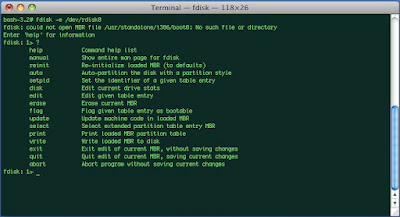
you can use question mard (?) and see the command list
write p (short for print) it will display you with all the available partitions on the selected disk, including details such as size, type etc. you will also see an astrik sign (*) next to the current bootable (flagged) partition, in this example case its 2.
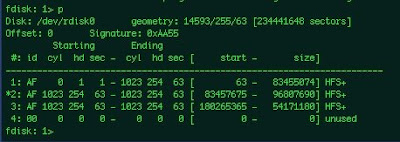
flag your partition to be bootable using the command:
f 1
(f is a short for flag) replace the number 1 with your installed leopard partition
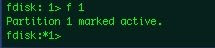
after you do that you can see there is an astrik sign (*) next to your prompt indicating that a change has occurred and no commit has been applied, you can use p (print) again, to make sure that the appropriate partition has been flagged
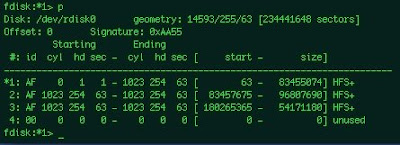
now write u (short for update)
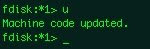
and w (short for write)

the astrik sign (*) has disappeared from your prompt indicating all changes have been applied, you can write q (short for quit)

once finished with the fdisk utility we can exit the Terminal application, you do that by clicking the Terminal Menu->Quit Terminal from the menubar it will bring you back to the main install window

now select the icon of the partition you want to install leopard on (the same partition you erased and named, same one you installed darwin on) and click continue

now you get to the actual install screen (after all the preperation)

in the lower left corner there is a Customize button that, press it.

it opens a window that allow you to select what components to install, if you know what you are doing then check your selection, if you are a beginner with hackintosh select only the ones that are marked in the image, note select EFI only if in "Darwin Install" you selected Yes in the Install EFI question, otherwise uncheck it.

when you finish click on the Done button in the lower right corner

you will returned to the "Install Summary" screen, press the install button

a popup (or scroll down) will appear and perform a checksum on the Install DVD to make sure all the files are correct intact and original, you can select to wait 2-3 minutes, or press skip

after the validation part is done (or skip is pressed) the OS file copy stage begins, this will take time, lay back and relax

the progress window looks like this:
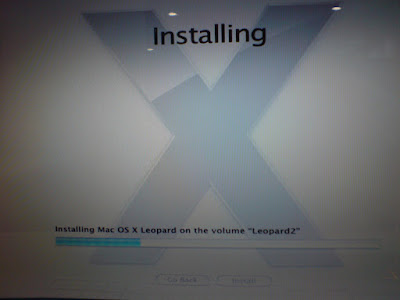
when the install process finishyou get this "Install Succeeded" screen and it will stay this way for 30 seconds, waiting for you to press restart, if you don't it will automatically restart anyway

before it will boot back up, eject the install DVD, you will not need it any more (for this install)

after the BIOS screen press F8 so the darwin boot screen will load

make sure you see the recently installed partition with the name you gave it (my example "Leopard2"), select it and press enter

now you see the apple gray boot screen

if all went well you will soon see (and hopefully hear) the great apple "Welcome video", you cannot press esc and stop it, so enjoy it until it ends and the next customization screen set appears

first screen is the region selection screen, select your region, if you cant see it check the the lower "Show All" checkbox

next is the country selection screen, choose your country, if you cant find it check the lower "Show All" checkbox

next is the keyboard layout screen, select your keyboard layout, if you cant see the one for you check the lower "Show All" checkbox

next screen is important, it gives you the opportunity to migrate data, setup, application etc. from an existing mac installation, if you have an upgrade install DVD version of leopard then you must have an earlier install of mac OS (like Tiger, check the "Install Tiger" post), if you don't have an upgrade install DVD you can choose the last option "do not transfer my information now" and click "continue", but if you have an upgrade version and you have previously installed a Tiger version on this PC then just choose: "from another volume on this mac" and click "continue", note: if this is an upgrade version DVD and you have not installed Tiger after you click "continue" it will go back to the "welcome video" stage and it will do that only 3 times after that the installation will be corrupted.

if you choose to transfer the information from previously installed mac, then this screen appears, asking you to select the data you want to transfer (you must select at least one user), make sure you have enough disk space and click transfer.

a transferring progress indication screen appear, it will take time depending on the size to transfer.

next it will ask you to select your internet connection type and set it up, it can be done but i prefer for first install to do only what has to be configured so i can see the leopard is launching and not that the internet connection has failed the installation, this wizard can always be activated from within leopard,

next it will display the registration sceen, fill in the fields and press continue

now it will warn you about fields you forgot to fill or filled incorrectly or if the email is invalid, ether fix the data (if it will not allow you to continue) or press ok to ignore

next the more questions screen appear asking you where do you use this mac and what describes your uses for it, and you may check the ckeckbox in order to be notified of new sales and new products etc. by email (don't check this checkbox)

next it will ask to send the registration info to apple, obviously you select "register later" and press continue.

next the set the date and time window appears allowing you to set the clock, set it and press continue.

now it will remind you not to forget to register with apple, press Done.

thats it in a minute you will have a leopard system working, now just calibrate your keyboard, so leopard will load the appropriate code for it, press continue.

first it will ask you to press the key next to the left shift,

in my case it is Z, click it once

next the screen changes and ask you to press the key next to the right shift,

in my case it is the question mark key (?) press it only once,

next it should notify you that the keyboard has been identified and allow you to ether press done or change the identification from the options available, (leave it and press done)

next you will see the leopard login window (actually the hackintosh hacked login screen) choose your user enter the password and click login

lastly you should see the leopard desktop and dock.

thats it, if you have problems or questions send a post here, if you succeed send your success story in insanelymac and your hardware setup in the OSX.org HCL Page,
Enjoy your Mac.


