this post will explain how to install packages from command-line interface (terminal or Single User mode),
where to get packages?
first thing you need to do is get the package, if you have downloaded it then cd to its location for instance:
cd /Users/shay/Downloads
if you have it only in the leopard install dvd then cd to the packages location like this:
cd /Volumes/Leo4Allv3-10.5.2/System/Installation/Packages
Note: your dvd name will probably be different then "Leo4Allv3-10.5.2"
next you should create a temp folder where you can work at:
mkdir /mytemp
and copy the desired packages to there:
cp -R powermanagement.pkg
and move to the folder (so each command you execute will be executed in relative to that folder):
cd /mytemp
what is a package?
a package is a compressed file or folder (can come in two forms), that can be executed due to its extensions pkg.
after execution a graphical installer will be launched and after several clicks a script will install files and folders into your hackintosh/Mac system.
how to extract package?
the package file can be extracted into a folder form using a command line tool named pkgutil,
you can check if your package is a flat file package or a directory package like this:
try to: "cd powermanagement.pkg"
if the result is: "-bash: cd: powermanagement.pkg: Not a directory"
then you are dealing with flat file, in order to install it from command line you need the folder form so lets convert it to a folder form, you do it like this:
pkgutil --expand powermanagement.pkg powermanagement_ex.pkg
so now you may "cd powermanagement_ex.pkg" successfully.
what's inside a package?
if you look inside the pkg folder (from finder right click and choose "Show Package Contents") or from command line using the cd command you will find the next folder structure:
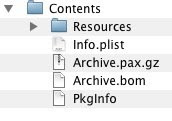
the most important files are:
Archive.bom - this file contains information of what is the content of the package, where it should be installed, etc.
Archive.pax.gz - this is the actual content of the package zipped (this is where we are heading)
you may sometimes find in folder Resources a shell scripts that should be run pre install and post install these scripts handle creation of folders, deleting temp files, fix permissions etc.
how to extract package content?
you can expand the Archive.pax.gz in order to get the files and copy them to the destination folder manually (and by that install the package) like this:
(the first cd command is adviced so files and folder extracted will not overwrite existing system files and folder, ofcource you may want to create a new folder and cd to it instead of the myTemp folder)
cd /mytemp
gzip -d powermanagement_ex.pkg/Contents/Archive.pax.gz
pax -r '*' <>
mkdir /mytemp
and copy the desired packages to there:
cp -R powermanagement.pkg
and move to the folder (so each command you execute will be executed in relative to that folder):
cd /mytemp
what is a package?
a package is a compressed file or folder (can come in two forms), that can be executed due to its extensions pkg.
after execution a graphical installer will be launched and after several clicks a script will install files and folders into your hackintosh/Mac system.
how to extract package?
the package file can be extracted into a folder form using a command line tool named pkgutil,
you can check if your package is a flat file package or a directory package like this:
try to: "cd powermanagement.pkg"
if the result is: "-bash: cd: powermanagement.pkg: Not a directory"
then you are dealing with flat file, in order to install it from command line you need the folder form so lets convert it to a folder form, you do it like this:
pkgutil --expand powermanagement.pkg powermanagement_ex.pkg
so now you may "cd powermanagement_ex.pkg" successfully.
what's inside a package?
if you look inside the pkg folder (from finder right click and choose "Show Package Contents") or from command line using the cd command you will find the next folder structure:

the most important files are:
Archive.bom - this file contains information of what is the content of the package, where it should be installed, etc.
Archive.pax.gz - this is the actual content of the package zipped (this is where we are heading)
you may sometimes find in folder Resources a shell scripts that should be run pre install and post install these scripts handle creation of folders, deleting temp files, fix permissions etc.
how to extract package content?
you can expand the Archive.pax.gz in order to get the files and copy them to the destination folder manually (and by that install the package) like this:
(the first cd command is adviced so files and folder extracted will not overwrite existing system files and folder, ofcource you may want to create a new folder and cd to it instead of the myTemp folder)
cd /mytemp
gzip -d powermanagement_ex.pkg/Contents/Archive.pax.gz
pax -r '*' <>
the result will be the contents of the package sorted in the destination folders at the current directory, in this example:

how to manually install the package?
after extracting the content you need to copy each file to its destination,
this package for instance, have System as root of files meaning the kext files should be on your hard drive at /System/Library/Extensions etc.
the simplest way to "install them will be to copy the whole tree like this:
cp -R /mytemp/System /
this will tell leopard to copy the current folder System into the root (so if it exist it will populate it if not it will be copied)
last thing to do is to go over the post install script and see if there are other actions need to be taken as part of the install process, display the content of the script like this:
cat powermanagement_ex.pkg/Contents/Resources/postinstall | more
in this case the script will look like this:

so in this case we need to copy the files to system (we already done that), and fix permissions, a faster way will be to do this:
chmod -R 755 /System/Library/Extensions
chown -R 0:0 /System/Library/Extensions
or even safer like this:
diskutil repairPermissions /System/Library/Extensions
Summary
so lets go over the commands we need to do in order to install powermanagement.pkg from command line:
cd /Volumes/Leo4Allv3-10.5.2/System/Installation/Packages
mkdir /mytemp
cp -R powermanagement.pkg
cd /mytemp
pkgutil --expand powermanagement.pkg powermanagement_ex.pkg
gzip -d powermanagement_ex.pkg/Contents/Archive.pax.gz
pax -r '*' <>always use pacifist or packageutil or simply double click the pkg file if you are in GUI in order to install the package.
is there a difference between manual install and GUI automatic install?
yes, during GUI install the installed package is registered in mac install database and a receipt is kept there with the information of the installed files, location etc. this info may come handy when you want to reinstall, uninstall, or verify that the install is intact.
yes, during GUI install the installed package is registered in mac install database and a receipt is kept there with the information of the installed files, location etc. this info may come handy when you want to reinstall, uninstall, or verify that the install is intact.
more then that most install create backup and allow uninstall feature in a later time, although you can do backup, a complex install makes uninstall process almost impossible.
Shay.